

Hi everyone! On Tuesday 29/11 I had the chance to show the crafty things that I create at a Christmas Market stall I organised at my office (5% of the sales went to charity), and I’m super happy with the experience and the feedback I got from all the people, so I just wanted to share this with you, for all who missed it, so you can have an idea of what happened, what the people saw (including a video of my Book of samples) and also in case you want to organise a stall yourself, I’ll add my checklist of things to be done ahead, during and after and what can be improved for the next time.
Hola a todos! El martes 29/11 tuve la oportunidad de mostrar las cosas artesanas que hago en un puestecito navideño que organicé en mi oficina (el 5% de las ventas fueron a una ONG) y estoy súper contenta con la experiencia y el feedback que tuve de toda la gente, así que quería compartirlo con vosotros, para todos los que no pudieron venir, para que podáis ver qué pasó, qué vio la gente (incluido un vídeo con mi book) y también por si queréis algún día montar un puestecito vosotros os añado mi lista de cosas, a hacer antes, durante y después y qué se puede mejorar para la próxima vez.
En castellano por aquí / Spanish here
I arrived early in the morning (8am) and after getting my 3 tables set, I placed the mantelpieces (sewn the previous night out of blankets and a piece of goldish velvet fabric for the bottom part which my friend Julia gave me long time ago), I set them with pins, I hanged my handmade scrapcosy bunting, I placed the wood drawers on the middle table so they could support the sign (also prepared the previous night) where you could read “Christmas Market, scrapcosy.com, 11:30 to 14:30, handmade notebooks, cards, advent calendars…” (I wanted to add “and more”, but I run out of space, so the three dots did the trick :)). Everything was ready to tell people arriving at 9 that something would be happening there today (Important: mention the time, the subject and some info already).

Then I went to the canteen and I left some fliers on the tables, so anybody having breakfast or lunch would know about the stall happening just outside.
Then I went to work, couple of meetings and by 11:20 two friends helped me bringing down my bulky stuff (thanks Sarah and Umesh!!) and I started putting everything in place. I started with the notebooks. Before I could even put them properly, my first
customer appeared, he started looking through them and I asked “do you like them?” and he directly said, “yes, I want this one”. That was quick! I didn’t even have my purse ready to give him change! I fixed that quickly and carry on setting the stall until it look something like this.
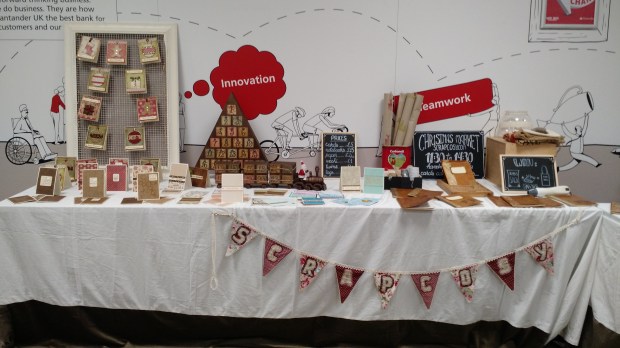


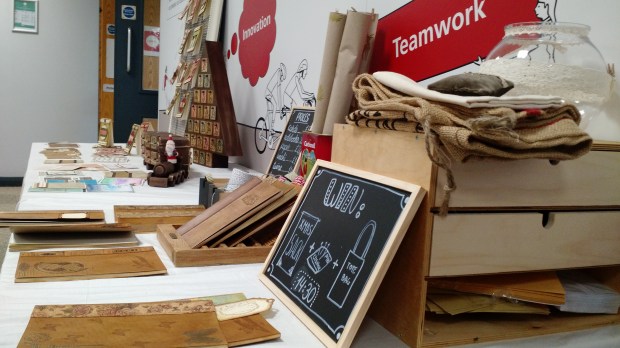
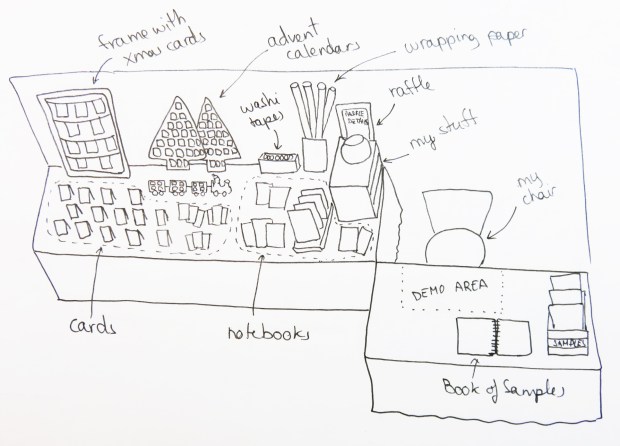
And this was to be the “floorpan”, from left to right: cards, advent calendars, notebooks, wrapping presents section, then the demo and samples area. The plan was that I would seat behind the desk on the demo area to show the samples and to demonstrate how to use embossing powder, which is a surprising thing if you’ve never seen it before.
Well, that was the plan, but once the market was officially opened (basically, once the clock hit 11:30) and before I could sit down, people started coming, so I just stood there, behind the desk wrapping the cards and notebooks that people kept buying. It was a good idea bringing envelopes with me, plain and big enough to put the notebooks in and slip in a contact-business-card and a handmade 5% voucher for future orders (see below), which was very welcome by them. When I was not wrapping, I was explaining about my samples book.

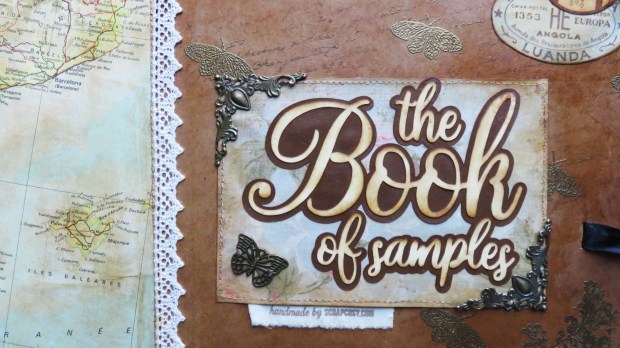
Oh yes, displaying my samples book or AKA the Book of Samples (video below), was also a good idea. Every time I create something, I take a picture of it. I started taking pictures in 2005, long time ago, with the aim of creating a blog or a website eventually and having there all the pictures in my gallery. Well, of course, pictures from 2005 with the digital cameras at the time were pretty awful, the light used was very bad, I just used to take one picture per item, so it was probably blurry with a bad background and also the item itself had a very amateur result, so not worth sharing it with the broad wide world… But since I have the blog, I’ve taken better care of my pictures, often using Instagram to show a summary of most of my projects so I had already a selection of items in the typical square layout that I like and that they were worth sharing. I thought that this event would be the best opportunity to display and explain what I do so I spent the previous weekend preparing the album-book. I could have done many more cards and notebooks instead, but I preferred to invest my time on the samples book, and I believe it was a good decision. Now it’s done and it can come with me to any new event.
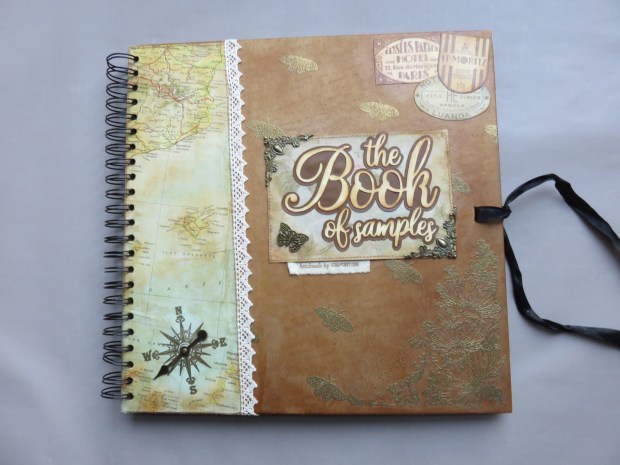
The Book of Samples is divided in 5 sections, one divider tab per section: Albums, Notebooks, Cards, Weddings and Miscellanea. Albums section it’s my baby, so it had to come first, it’s what I love most doing and I have so many examples to show how customised an item can be, that besides the picture it was worth also adding an explanation about the people involved, the case, what details were added and why. The remaining sections didn’t need much explanation in comparison to the albums, the pictures already speak for the items, although many people have told me that seeing the pictures has nothing to do with holding the real thing. I guess that touching the just received album and being able to look at the detail at your own pace, playing around with the interactive things (like spinners, textures, or hanging bits) adds more value than just observing a flat picture, it’s an enhanced experience. That is why it was also important for me to create the book as if would be my album, customised for me, so the album itself it’s also a sample.

If you want to have a look at the complete Book of Samples, here is the video and the digital version in pdf:
Ok, back to the market: the advent calendars were gone very soon. One actually didn’t make it to be available for the day, it was already sold 2 days before or more but its new owner, Loretta, allowed me to keep it in display until the end of the market so it could dress up the table. These are all the advent calendars I made, only the train is available still:

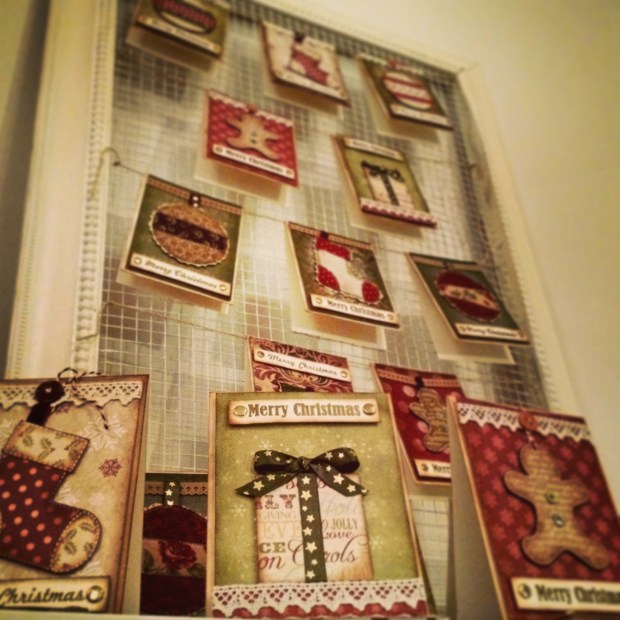
The traditional postcards were hanging from a beautiful frame that my friend Valentino gave me. Before the stall I tried at home how it would look like and how much space would I need for the cards. It is good if you can test the setup beforehand, so you have an idea of whether your table will look too empty or too full, so you may need to add some decoration to fill it in or order for a new table if you can extend your space.
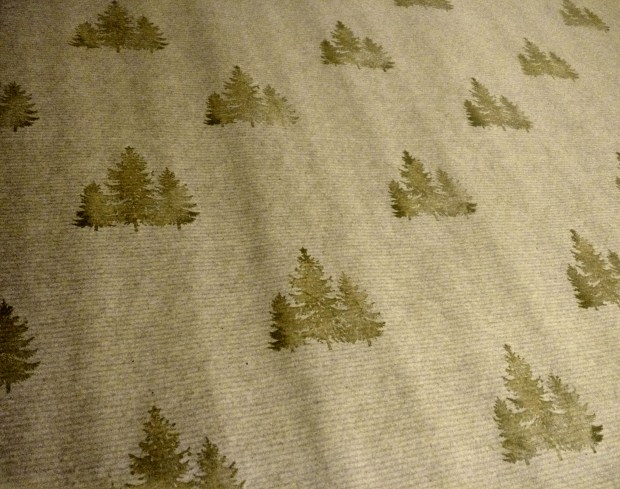
I created handpainted wrapping paper, but nobody seemed to notice, such a pity, since they looked very nice from my point of view:
Many of the notebooks were gone, but I forgot to take pictures (shame on me!).And I did a free raffle, the price was small (a pin cushion holder made by me the previous night, a tote bag and a xmas sack), but it was worth for the people to give me their email address in exchange for a chance to win these and in return I told them I would eventually send them an email when new product releases happen. The winner was Preema and I contacted her separately (I still need to send the email confirmation to the rest of participants).
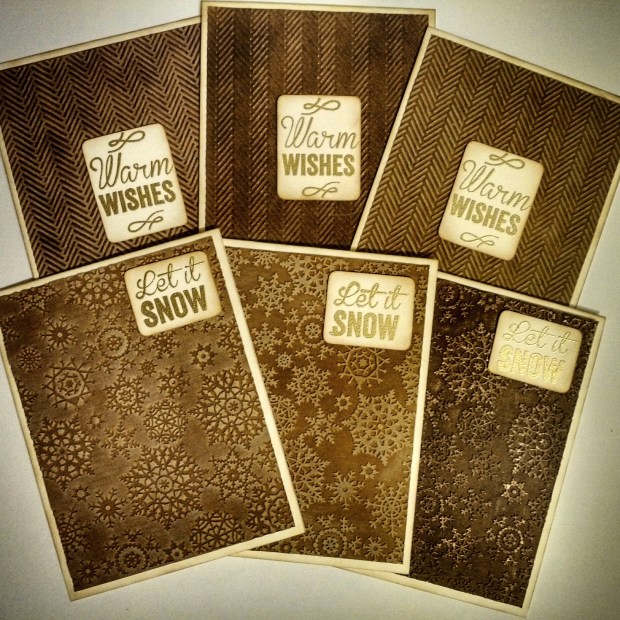
These are other non-traditional cards that I made:
I managed to do 2 demos of what is heat embossing (in gold, my favourite) so people could understand part of the process and because in my opinion is one of the most amazing things in scrap. If you want to know what is embossing, just click on this video so you know what I’m talking about.
By 14:00 the majority of the people had already come and I had very few left visitors, so I started packing at 14:20 and selected the winner at 14:30. My friend Sarah came to rescue and helped me bringing things up and that was it for the day. I was very happy with the experience and I may repeat it again (either in spring or in a year’s time).
Now let’s go with the checklist / suggestions / advice. I remember reading some of them some day somewhere (very useful info of the source, I know) and I have also included my own tips based on experience and common sense and on what worked for me:
- Date: Decide the date and set it. If there is a date, the objective is real, it is happening and you have a goal.
- List: Make a list of all the things that you’d like to happen before the day comes and prioritise them as essential, important or nice to have, so you can action first what really matters (e.g., having a minimum number of products to sell, creating my book of samples, sewing the mantelpieces or finding a replacement to cover the tables) and leave to the end what you can survive without (e.g., sewing an apron with zippers by way of “cashing machine”, instead of that I finally got an old purse with a stripe so I could pass my belt through, replacement found, easy peasy)
- Products: Prepare your products in advance, as much as you can. Try to plan that you need time to pack everything and that you need to carry it. In my case, since I was in the office I could start bringing things in a couple of days ahead and leave them in a locked cabinet.
- Getting noticed ahead: One week before I posted some signs around the office, in the office boards, the coffee machines and the ladies toilet main door in each of the floors of the building.
- the best location, is the coffee machine where people have to read while their coffee is made. In the noticeboard the sign gets lost among the rest.
- And only one week ahead for 2 reasons, (1) I decided at the last minute that I would do the stall, so I didn’t have time to finish the sign earlier and (2) if you place a sign more in advance, then people get curious the first few days but then the sign becomes so familiar that they forget it’s there, so they would forget that the event it’s happening even on the day it is happening. One week in advance may make them think: OK, it’s Tuesday, not this one but the following one. And for 5 working days they are reminded and it’s still fresh.
- Get somebody with fresh eyes to read your sign fully and completely… with the rush I made a couple of spelling mistakes… oh gosh! Lesson learnt!
- Change: Start collecting change. In my case I started paying all the coffees and meals at the canteen in cash, with £10 so I would always get a £5 and few extra pound coins. I did that for 2 weeks (2 purchases per day) and it was enough. I felt sorry to empty their cashing machines… but it will be once or twice per year, no more :). Count it so you know how much money was in first.
- Inventory: make a list of all that is on sale and tick it while it’s being sold (I didn’t do this an I’m still trying to assess how many things of each I did sell… Lesson learnt 2!
- Prices: I decided to set my prices easy and round (£5, £10, £15, etc.). All cards same price, all notebooks same price. It was not fair for the products because some cards take far more than others, but you know what? my objective this time was to be known, so I preferred that the cards were affordable so I could reach more people. It was an investment. And some of the cards were from last year, so I had to let them go, even if that broke my heart.
- Decoration: Prepare the decoration of the table and test it if possible, so you know if the space is enough for you (I had to book an extra table when I realised how small each table was…)
- Select a decoration that is light to carry whenever you can
- Try to add some verticality so not everything is flat on the table and it can be seen from few meters away
- Consider make it themed (xmas, spring, vintage), cohesive and faded: not too many colours and distracting bits and pieces, the important bits are your products and you don’t want to be continuously asked: “what is the price of the typewriter?” which is part of the decoration, if you know what I mean…
- Space: Plan your space so you know where is going what and if you want to sit behind the table, if you will be on the front, if you need the table to be against the wall so things can be leaning on it. I wanted both, so my floorplan had kind like a z shape, 2 tables against the wall and one bit forward so I could sit behind. Distribute your products grouped by things (never heard of the herd theory? A group of things of same kind together look nicer than looking at each item individually)
- Bring samples: If you don’t have time to do a specific product (and less time to do 10 of them) but you have a sample, bring it. It’s better that people see what you can do rather than you explaining and they imagining it, you never know, this could lead you to a future order (in any case, you are doing an inception, seen the movie?). In my case apart from the book of samples I also brought other samples, like a travel journal that I created for my Japan trip, some mockups of a menu for a restaurant in NYC, some samples of wedding menus, a folder that I did for my boyfriend, etc.
- Explain your creation process: I know this may seem like sharing your magic with the world and risking that somebody copies you but really, I don’t think that will be the case. If they can copy what you do then what you do it’s either too simple (anyone can make it) or they are really good (an artist or crafter like you), so in either way, they deserve credit too if they are able to replicate it. But most of people I talk to say that they wouldn’t be able to make the things I do (that’s because they didn’t try enough or didn’t have the patience!), so as you see they are not direct competitors but possible customers. And for instance, having samples of the notebooks “before” (blank) and “after” (ready to sell) with me at the table brought many surprised faces and questions of “did you do that out of that?”. I found very funny just saying out loud the sentence “I make them” to the people that where silently perusing the products. After my sentence you could see a sudden “WOW” reaction on their face and some would come and ask, “really?” and then I would point them to my sample book for more examples.
- Getting in touch:
- Bring business cards or contact cards, so people can contact you later should they want.
- Doing a raffle is a good way to collect emails, but then you need to ensure you mention you’ll email them eventually, should they don’t want to be included in the mailing list. And when you mail them I would always mention that they’ve been emailed because of the event raffle but they can unsubscribe anytime by replying the email.
- I gave 5% discount vouchers to those people who show some interest.
Thanks for reading! And see you in the next post! 🙂 If you want to send any comments or subscribe, go to the end of the post below
BOOK OF SAMPLES – MERCADO NAVIDEÑO
Llegué por la mañana muy temprano (8am) y después de que pusiesen en su sitio las tres mesas que había pedido, las vestí con los manteles (cosidos la noche anterior a partir de sábanas y de una tela dorada aterciopelada que me dio mi amiga Julia hace mucho), les puse pinzas e imperdibles para sujetarlos, puse mi banderola de scrapcosy, coloqué los cajones de madera a modo de soporte del cartel (que también acabé la noche anterior) que decía en inglés: “Mercadillo de Navidad, scrapcosy.com, 11:30 a 14:30, hecho a mano, cuadernos, tarjetas, calendarios de adviento…” (quería poner “y más” pero me quedé sin espacio así que me conformé con poner los puntos suspensivos 🙂 ). Todo estaba listo para avisar a la gente que llegase a las 9 de que algo iba a pasar allí (Importante, mencionar la hora, el tema y alguna información al respecto)
Entonces fui a la cantina y dejé algunos papelitos informativos en las mesas para que la gente que fuese a desayunar o a comer supiese que iba a haber un puestecito navideño justo al lado.
Por fin fui a trabajar, un par de reuniones y a eso de las 11:20 dos compañeros me ayudaron a bajar las cosas porque me faltaban manos para bajarlo todo de golpe (gracias a Sarah y a Umesh!) y empecé a colocar las cosas en su sitio. Empecé con los cuadernos. Antes de que pudiese colocarlos bien del todo apareció mi primer cliente que empezó a mirarlos. Le pregunté, “te gustan?” y me dijo, “sí, quiero este”. Qué rápido! Ni siquiera había tenido tiempo de colocarme el monedero en el cinturón para poder devolverle el cambio! Solucioné este punto rápidamente y continué colocando el resto de cosas hasta que conseguí algo como esto:
Y este era el plano, de izquierda a derecha: tarjetas, calendarios de adviento, cuadernos, sección de cosas para envolver regalos, y mesa de demostraciones y muestras. La idea era que yo me sentaría detrás de la mesa que está más avanzada para enseñar las muestras y hacer demostraciones de cómo se usan los polvos de embossing, por ejemplo:
Pues ese era el plan, pero una vez estuvo todo en su sitio y era la hora oficial (11:30), antes de que me pudiese sentar empezó a venir gente, así que me quedé de pie, detrás de la mesa, cobrando y envolviendo las tarjetas y cuadernos. Fue una buena idea traerme sobres de dos tamaños que usé como envoltorio para las tarjetas y los cuadernos. Además de lo que compraban, les ponía una tarjeta de contacto y un vale de 5% de descuento para futuros encargos que parece que fue bienvenido.
Cuando no estaba metiendo cosas en los sobres, estaba explicando sobre mi libro de muestras (vídeo más abajo). Crear el libro de muestras también fue buena idea. Cada vez que creo algo, le hago una foto. Llevo haciendo esto desde 2005, y el propósito de estas fotos era que acabasen en una galería de página web o blog que haría en algún futuro. Las fotos del 2005 evidentemente con las cámaras digitales de entonces son una birria… la luz que usaba era muy mala, hacía sólo una foto por cada cosa y probablemente la foto estaba borrosa y además, la calidad de las manualidades que hacía era muy de estar por casa… así que tampoco hace falta compartirlas con el mundo mundial… Pero desde que tengo el blog todo lo que he ido haciendo tiene más cara y ojos y las fotos las hago con un poco más de cariño y esmero. La mayoría de las veces uso Instagram como forma de compartir mis creaciones así que ahora ya tenía una selección de fotos decentes y en formato cuadrado, que valía la pena compartir. Así que decidí imprimirlas e invertir mi tiempo en preparar este álbum de muestras en lugar de hacer más tarjetas o cuadernos, ya que pensé que este evento sería una buena forma de mostrar y explicar lo que hago y cómo lo hago. Creo que fue una buena decisión y que ahora que ya lo tengo hecho puedo llevármelo a otros eventos y puedo seguir ampliándolo conforme vaya haciendo más cosas nuevas.
El álbum de muestras está dividido en 5 secciones mediante 5 separadores de pestañas: Álbumes, cuadernos, tarjetas, bodas y miscelánea.
La sección de álbumes es mi debilidad, así que tenía que ir la primera, es lo que más disfruto haciendo, lo más personalizado y de lo que tengo muchos más ejemplos, así que además de las fotos mostrando los detalles de cada álbum, hay una explicación sobre el tema del álbum, las personas involucradas, los detalles incluidos y el porqué de cada uno de ellos. El resto de secciones ya no necesitaban tanta explicación, las fotos ya muestran lo que hay, aunque mucha gente me ha dicho que las fotos no hacen justicia en comparación a tener en tus manos el producto final. Supongo que ver y tocar el álbum que acabas de recibir, descubrir cada detalle a tu ritmo y jugar con las partes interactivas (ruletas, texturas, cosas que cuelgan) tienen más valor que ver una sola imagen fija y vista desde un ángulo. También por eso era importante para mí crear el libro de muestras porque además del contenido, el libro en sí ya es una muestra de lo que hago (y estaba personalizado para mí).
Si queréis hojear el libro de muestras a fecha de hoy, aquí tenéis un vídeo y la versión digital en PDF:
Volvemos al puestecito: los calendarios de adviento duraron más bien poco. Uno de hecho no llego a estar disponible a la venta, llegó ya vendido, pero la dueña Loretta me lo dejó mostrar hasta el final para que decorase un poco la mesa. Estos son los calendarios que hice, de los cuales sólo quedó disponible el trenecito (no sé qué le pasa a la gente con el calendario de árbol, que me lo quitan de las manos, todo el mundo preguntando por él):
Las postales tradicionales colgaban de un marco muy bonito que me dio mi amigo Valentino. Antes del mercadillo, probé en casa como quedaba y cuanto espacio ocuparía tener las tarjetas en la mesa. Está bien hacer pruebas en casa porque así sabrás si el espacio del que dispones es suficiente, muy poco o demasiado, para que luego tu puesto no parezca que esté todo vacío o demasiado abarrotado y también para saber qué decoración cabe en la mesa y que te puedes ahorrar y dejarte en casa.
También estampé papel de envolver, pero parece que nadie lo vio, Una pena, porque a mí me parecía muy bonito:
Muchos de los cuadernos se acabaron (pero me olvide de hacerles foto con las prisas… muy mal por mi parte!).
Estas tarjetas también estuvieron en la mesa. Me encanta la textura que tienen:
También hice un sorteo. El premio era poquita cosa, un acerico (cojín para las alfileres) que cosí la noche anterior, una bolsa de tela y un saco de arpillera de Navidad. Aunque no era mucho, la gente consideró que valía la pena dejarme su email a cambio de la oportunidad de ganarlo y de recibir alguna que otra vez un correo de mi parte si saco alguna cosa nueva que les pueda interesar. La ganadora fue Preema y le contacté por separado (aún he de enviarles un correo a todos los participantes sobre quién fue la ganadora).
Llegué a hacer dos demostraciones sobre como usar los polvos embossing (en dorado, que son mis favoritos) para que así la gente viese parte del proceso de creación y porque ver cómo se hace un embossing es una de las cosas más impresionantes en scrap (al menos para mí). En la primera demo, parece que la gente salió de debajo de las piedras y me dio la impresión de que había menos luz. Era porque tenía mucha gente alrededor. Si queréis ver un vídeo sobre esta técnica, haced click aquí.
Hacia las 14h, la afluencia de gente fue bajando y ya tuve muy poquitos visitantes, así que a eso de las 14:20 empecé a empaquetar y luego hice el sorteo a las 14:30. Mi compañera Sarah vino al rescate y me ayudó a subir las cosas arriba y el mercadillo cerró sus puertas por este año.
La experiencia valió mucho la pena, estoy muy contenta con el resultado y si puedo, repetiré, ya sea en primavera o de nuevo de cara a Navidad, el año que viene.
Vamos a acabar con la lista de cosas que hice, consejos y sugerencias, por si alguien se anima a poner un puestecito y no sabe por dónde empezar, quizás les sirva. Recuerdo haber leído alguna de estas cosas en algún sitio, hace algún tiempo (menuda fuente de información más buena… vaya memoria la mía…) y he incluido lo que me acuerdo y que puse en practica junto con un poco de sentido común. Esto es lo que a mí me fue bien aplicar:
- Fecha: Decide una fecha. Si hay una fecha, hay un objetivo, va a pasar y tienes una meta. Así te pones las pilas.
- Lista: Haz una lista de todas las cosas que quieres que pasen antes del evento y dales prioridad entre: imprescindibles, importantes, puedes-sobrevivir-sin-ellas, así podrás acometer lo que es prioritario primero (como tener un mínimo de producto que vender, hacer mi libro de muestras o coser los manteles o encontrar algo para reemplazarlos) y dejar para el final lo superfluo o que no va a pasar nada si no consigues hacerlo (como hacerme un delantal con cremalleras para guardar el cambio y el dinero, no me dio tiempo y lo sustituí por un monedero que se sujeta al cinturón y listos).
- Productos: prepara tus productos con tanta antelación como puedas. Piensa que también necesitas tiempo para empaquetarlo todo y que tendrás que transportarlo todo al sitio del evento. En mi caso, como era en la oficina, fui llevando cosas poco a poco, unos días antes, y las iba guardando en un armario bajo llave.
- Anuncia el evento con antelación, pero no mucha: En mi caso, una semana antes puse algunos carteles en los distintos tableros de anuncios de la oficina, también una versión reducida de los mismos en las máquinas de café y en las puertas de los baños de las chicas y repetí el proceso en cada planta.
- La mejor localización, sin duda, la máquina de café. La gente que espera a que salga su café va a leerlo sí o sí porque les queda delante.
- Lo puse sólo una semana antes por dos motivos: (1) tomé la decisión de montar el mercadillo en el último minuto, así que tampoco pude hacer los carteles, imprimirlos y colgarlos antes, y (2) si pones un cartel con mucha más antelación, incluso si es en la máquina de café los primeros días lo irán leyendo pero al final pasará desapercibido y puede ser que incluso el día del evento se olviden de que éste va a pasar. Una semana de antelación les puede hacer pensar: Oh, es el martes, no este sino el siguiente. Y durante los 5 siguientes días laborales, el cartel sigue estando fresco hasta que llegue el día.
- Una vez tengas el diseño del cartel (que tiene que incluir como mínimo día, hora, lugar y qué va a pasar y si incluye además ejemplos, detalles y tu información de contacto, todavía mejor) que alguien (no tú, que llevas haciéndolo un buen rato) lo lea y vea si hay faltas de ortografía… Yo no lo le pedí a nadie que lo leyera con ese propósito, y en fin, os podéis imaginar el resto…
- Cambio: empieza a recaudar cambio, billetes pequeños y monedas con antelación. En mi caso empecé a pagar cafés y comidas en la cantina en metálico con billetes de £10, así siempre me devolvían uno de £5 y monedas sueltas. Hice eso durante dos semanas (dos pagos diarios) y ya tuve suficiente. Me supo mal por las cajeras… les vacié las cajas de lo lindo… pero bueno, no creo que repita esto muchas más veces al año. Cuenta el dinero con el que empiezas el mercado para luego saber con cuánto has acabado.
- Inventario: haz una lista de todas las cosas que sacas a la venta, así si te despistas porque no paras de vender, sabrás qué no está ya en la mesa y por tanto qué es lo que has vendido. Entre eso y el saber con cuánto dinero empiezas y acabas en el monedero, podrás cuadrar la caja y saber cuánto de cada se ha vendido. Que no te pase como a mí, que no lo hice y luego no me cuadraba nada… Lección aprendida para la próxima.
- Encargos: si te encargan algo al momento, apúntalo y apunta si te han pagado por adelantado o si queda pendiente, para evitar confusiones luego…
- Precios: decidí poner mis precios redondos (£5, £10, £15, etc.), así era mucho más fácil cobrar y dar el cambio. Ya sé que unas tarjetas cuestan mucho más de hacer que otras, pero sabéis qué? mi propósito esta vez era darme a conocer y que la gente se llevase un buen recuerdo. Indudablemente vendí las tarjetas más baratas de lo que deberían ser, pero era una inversión para mí.
- Decoración: prepara y prueba la decoración de la mesa con antelación, así sabes si el espacio con el que contarás es suficiente, o demasiado (en mi caso tuve que pedir una mesa más cuando una semana antes vino una persona a vender libros y vi el tamaño de cada una…)
- Elige decoración ligera, así será más fácil de transportar
- Intenta añadir verticalidad, para que no quede todo plano en la mesa. En mi caso puse el marco, los cajoncitos y los calendarios de adviento.
- Considera hacerla temática (navidad, primavera, vintage), coherente y sutil: no demasiados colores y cosas decorativas que salten mucho a la vista si no están a la venta. No querrás que todo el mundo te diga lo bonita que es la máquina de escribir antigua (que es sólo de decoración) y que no se fijen en tus cuadernos…
- Espacio: estructura el espacio que tienes para saber dónde va cada cosa, si te quieres sentar detrás de la mesa, si necesitas pared para apoyar algo, etc. En mi caso quería ambas cosas, por eso hice esa disposición y por eso tuve que coser 2 manteles en lugar de uno largo. Agrupa los productos por secciones (habéis oído lo que es la teoría de la manada? Un grupo de cosas del mismo tipo juntas lucen mejor que cada cosa independientemente).
- Traed muestras: Si no tienes tiempo de preparar un producto en concreto ( y menos tiempo de hacer 10 del mismo) pero tienes una muestra, tráela. Es mejor que la gente vea lo que puedes hacer que que tú lo expliques y ellos tengan que poner la imaginación. Yo tengo mucha imaginación pero una imagen vale más que mil palabras… de ahí mi libro de muestras y todas las otras cosas que traje y sobre las que varias personas me preguntaron: el diario de viaje que me hice para Japón, la carpeta que le hice a mi novio para que guardase sus dibujos, unos menús de muestra para un restaurante de NYC, menús que hice para la boda de unos amigos que me sobraron, etc.
- Explica tu proceso creativo: Sé que parece que compartir tu magia de como haces las cosas con el mundo sea arriesgarse a que alguien te copie, pero en serio, no creo que ese sea el caso. Si alguien copia lo que tú haces es porque o lo que haces es demasiado sencillo (cualquiera lo puede hacer) o ellos son unos cracks (unos artistas o artesanos como tú), o lo que haces es tan bonito que les inspiras a seguir tus pasos, así que en cualquier caso, se merecen un aplauso si son capaces de hacerlo tan bien como tú. Pero por experiencia os digo que la mayoría de la gente me dicen que no serían capaces de hacerlo ellos mismos (eso es porque no lo han intentado o porque no tienen paciencia!) así que no les veáis como competencia sino como clientes. En mi caso, para explicar lo que hago recurrí a mostrar el antes (libretas y álbumes en blanco, por decorar) y el después (el producto acabado) y la gente miraba alucinada como algo tan austero acababa tan bonito. Me hacía mucha gracia ver a la gente que miraba de refilón la mesa, como de pasada rapida, entonces yo soltaba un “lo he hecho yo” y eso causaba un efecto “wow”, se paraban, lo miraban por segunda vez, con otros ojos (como platos), y preguntaban “lo has hecho tu?” y entonces yo les señalaba mi libro de muestras para que vieran un poco más. Me sorprendió gratamente ver que la gente realmente lo miraba con interés. 🙂
- Establecer contacto:
- Trae tarjetas de contacto con tus detalles (correo, web, lo que sea) para que la gente pueda contactar contigo si quieren
- Hacer una rifa me valió el poder recolectar correos (avisé a los participantes de que en algún momento les contactaría si tenía algo que compartir y que siempre me podían pedir salir de la lista contestando al correo que les envíe)
- Di descuentos de un 5% para compras futuras a todo aquel que mostrase cierto interés. Los descuentos los hice a mano, así que además son una muestra artesanal de lo que hago, un pequeño recuerdo para el que quiera guardarlo.
Eso es todo por hoy! Casi nada… Si tenéis alguna sugerencia o comentario, ya sabéis, hay una sección más abajo para hacerlo. Muchas gracias por leer! Hasta el siguiente post! 🙂

So Cool!.. I love it!… Everything!. Can’t wait to see more of it!. : )
LikeLiked by 1 person
Me encantaaaaa!!! Pero que preciosidades!!!
LikeLiked by 1 person
VAYA CURRADA, ESTA MUY BIEN EXPLICADO, ME ENCANTA.
LikeLiked by 1 person