

Welcome to All about Infusions! This is part 1 of a series of videos that I’ve prepared to walk you through the world of Infusions.
Bienvenidos a All about Infusions! Esta es la Parte 1 de una serie de videos que he preparado para introduciros al mundo de los Infusions.

En castellano por aquí / Spanish here
We will explore different uses and techniques that I’ve gathered from different sources, some of them you may be familiar with, widely explained by Leandra and other PaperArtsy fellows and some of them are new, coming from my own experiments in which I use infusions in combination with other products and tools.
We will see from the basics, how they react with water, how they can be applied with glaze and we will move to other unexpected products like alcohol and foil, just to mention few of them. And we will create our own coloured products out of them, like texture paste, gesso or even mica sprays. So sit back, relax, grab a cup of tea and a couple of scones and let get this party started!
Please feel free to leave me your comments and suggestions if you want me to explore some other products or techniques. This is just the beginning (part 1) and I can prepare more videos, so we can capture all the possibilities that these great products give.
WATER
In this video we are going to explore the world of water in three parts. Watch the video and/or look at the pictures and comments below:
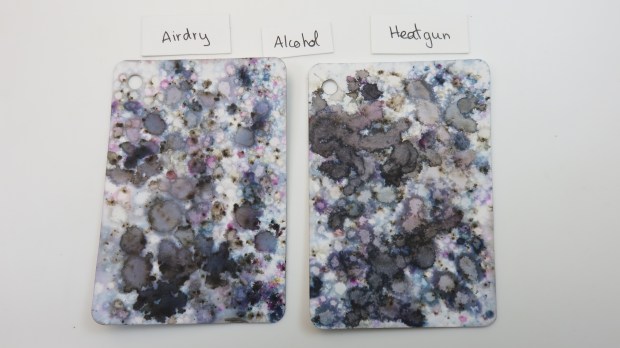
Let’s start with the basics in part 1. There are different variables that can affect the results that you get from your infusions, in this case we are going to play with 2 of them: amount of water and drying process. We will create 3 samples varying the amount of water and we will repeat this 3 times by changing the drying process. This first set is going to be airdried.


The second set it’s going to be dried using paper towel which will give a more subtle colour
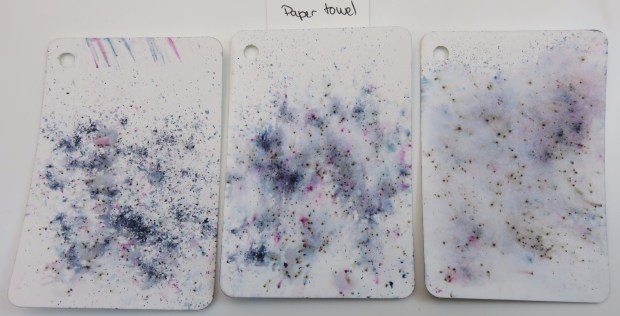
Finally in the third set, we will use a heatgun which will speed put the process and add some movement.

In this second part, instead of just spraying the water, we are going to use a brush to get a uniform layer. This is a good way to get a foundation layer. I’m showing the brush technique in the middle and I’ll compare it to the ones which had lots of water in the previous part, so you can see the difference:

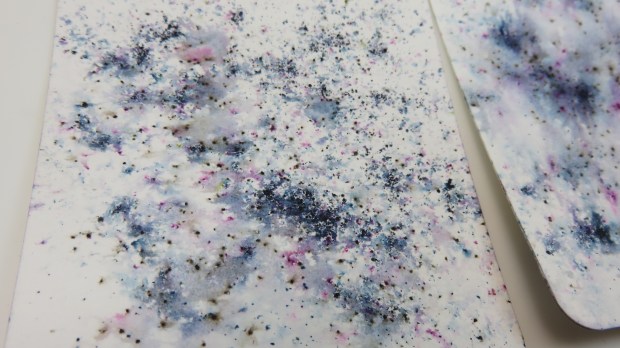
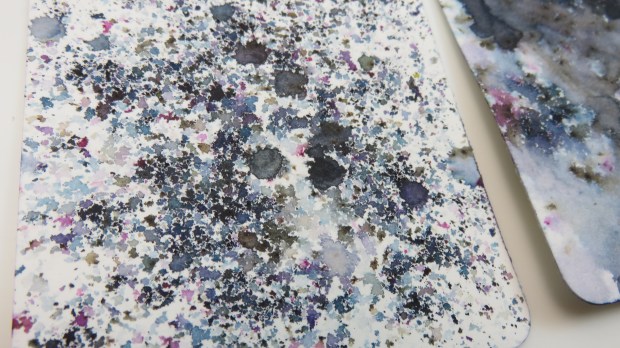
In this third part we are going to apply multiple colours of infusions in different ways, so you can see that you can get randomness, or a bit of a pattern and you can get more or less vibrant colours depending on the way you choose.

These 2 have been done using the foam applicator:
And these 3 just spritzing water as we did on Part 1:

GLAZE
In this video we are going to explore 3 basic uses of glaze. First we are going to play with the amount of infusions. We will achieve different gradients of colour, from more subtle to more vibrant and we will achieve a wood effect by applying the infusions with a brush in vertical strokes. In the second part, instead of applying with vertical strokes we will combine these with horizontal to get linen effect. The third part is about combining infusions and glaze with a drop of a metallic paint, in this case gold, to get extra shine
By varying the amount of infusions we will achieve different gradients of colour, from more subtle to more vibrant and we will achieve a wood effect by applying the infusions with a brush in vertical strokes:

If instead of applying vertical strokes we will combine these with horizontal we can get a linen effect. See the 2 options side by side:


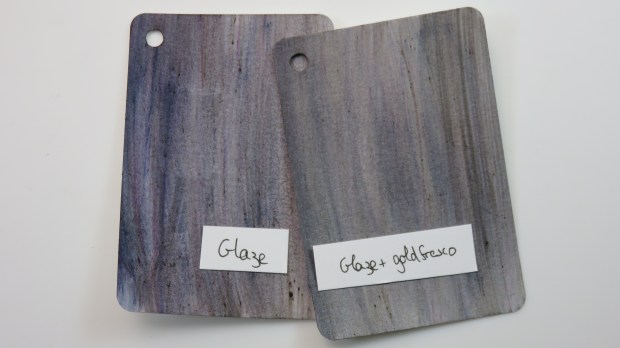
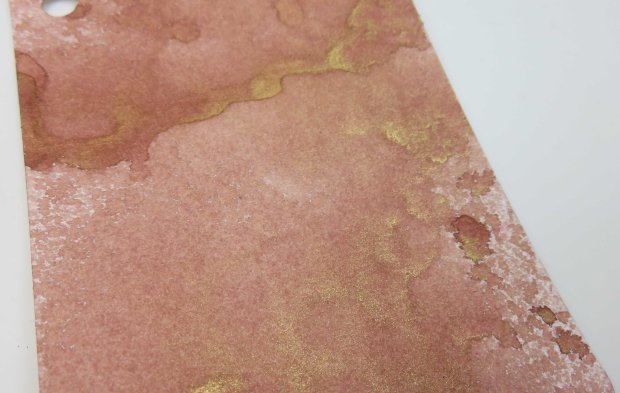
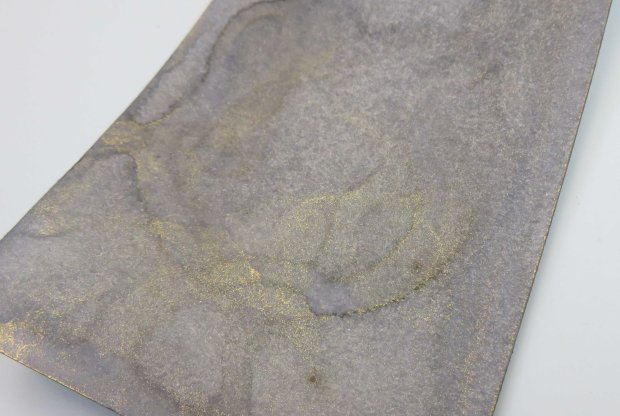
Finally you can see that by combining infusions and glaze with a drop of a metallic paint, in this case gold, you can get an extra shine. Here is the comparison between “just glaze” vs “glaze and gold”. It’s a pity that the camera doesn’t pick the shiny effect that well…

ALCOHOL
In this video the alcohol is the star of the party. It really is a game changer. I used it in 2 different ways, spritzing it and applying it with an applicator
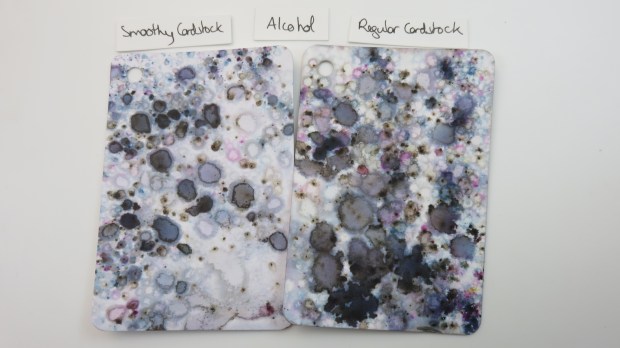
Water and alcohol don’t like each other very much, so once you have your droplets of water (infusions in the surface and then you spritz with water) if you then spritz alcohol, the water tries to escape the alcohol and that forms rounder droplets, leaving white spaces where the alcohol touches and soaks into the paper. The smoother the paper the bigger the white spaces. This is regular cardstock so it is absorbent (not as much as watercolour paper)

Here is the comparison between using regular cardstock vs smoothy cardstock. With the smoothy one you get more like a mosaic. I have the feeling that this is because the liquid runs more freely and takes more time to soak in, so the alcohol goes into the paper and pushes the water with infusions to the centre:

You can apply the alcohol with an applicator. I used felt applicator where I put 4 colours of infusions then spritz water and then alcohol and applied this into regular cardstock and into a cardstock where I applied and dried a layer of glaze first. I repeated the same on a glaze surface but this time with less than a drop of gold fresco paint. Here are the 3 samples using the felt:

If instead of felt I used a foam applicator, the result is slightly different. More subtle and with more texture due to the foam and bubbles I guess:

FOIL
In this video I’ll show you a quick technique about using foil with infusions.
You just need to spritz with water, dry slightly with paper towel, put the foil on top and run through your regular laminator to achieve these:


DIY MICA SPRAY
In this video I’ll show you how you can create your own mica spray with your infusions. To do this technique you just need infusions, pearl ex, a drop of glaze and water
Here are some pictures of what you can get:

GESSO
In this video I’ll show you how you can create your own coloured gesso:
Pictures of the result:

ACRYLIC PAINT
In this video I’ll show you how you can create your own Acrylic paint using Infusions and a base paint like Chalk fresco (white paint). I’ll also show you how to use infusions and an acrylic paint to create a marble effect in different variations.
This is the DIY acrylic paint, which I compare with the gesso sample, so you can see that these look very similar:

And this is the marble effect by lifting the paint from an acrylic block. I painted the acrylic block and then I added infusions & spritzed water, then I pushed my paper onto the acrylic block:

And here is the same technique but just working directly into the cardstock:

That’s all for today in All about Infusions. New more techniques coming in a part 2 very soon. In the meantime, if you want to send any comments or subscribe, go to the end of the post below
Thanks for reading! And see you in the next post!
ALL ABOUT INFUSIONS – 1
Hola a todos! En este caso aun no he podido hacer los videos en castellano, asi que toca verlos en ingles. Cuando estén listos, modificare el blog post y actualizare los enlaces. De momento aquí os dejo la versión en ingles sobre los distintos usos de Infusions combinados con estos productos.
AGUA
En este video exploraremos el mundo del agua.
En una primera parte vemos como variando la cantidad de agua y el tiempo o metodo de secado conseguimos distintos resultados.
Secado al aire:
Secado con papel de cocina:
Secado con secador para embossing (heatgun):
En este ejemplo muestro en medio (brush) como aplicando infusions, pulverizando con agua y extendiendo con un pincel consigo un resultado mas suave que con el metodo de secado al aire (airdry) y secado con secador (heatgun). Es una forma de conseguir un fondo en el que empezar a trabajar:
Aquí utilizaremos varios colores y distintas formas de aplicarlos:
Estos se han hecho usando un aplicador de esponja:
Y estos pulverizando agua:
GLAZE (Barniz al agua)
En este vídeo vemos 3 usos básicos de infusions con glaze, este barniz al agua. Primero variaremos la cantidad de infusions cuando apliquemos la glaze, para obtener diferentes gradientes de color, de más sutil a más vibrante y conseguiremos un acabado como de madera al aplicarlo con pinceladas en vertical. Luego veremos que combinando pinceladas en vertical y horizontal conseguimos un acabado como de lino. Finalmente usaremos además de glaze, pintura acrílica dorada para conseguir un brillo metalizado:
Al variar la cantidad de infusions cuando aplicamos la glaze, obtenemos diferentes gradientes de color, de más sutil a más vibrante y conseguiremos un acabado como de madera al aplicarlo con pinceladas en vertical:
Combinando pinceladas en vertical y horizontal conseguimos un acabado como de lino:
Si además de glaze usamos pintura acrílica dorada conseguiremos un brillo metalizado. Es una pena que en las fotos no se capte ese brillo…
ALCOHOL
En este vídeo el alcohol es el protagonista y marca la diferencia. Lo uso de dos formas, pulverizado (después de haber pulverizado agua) y aplicándolo mediante aplicador:
El agua y el alcohol no son muy amigos que digamos… se repelen, así que cuando pulverizas con agua encima de infusions generando gotas gordas, cuando luego pulverizas con alcohol, el agua se intenta escapar generando gotas mucho más redondas y dejando espacios en blanco. Cuanto menos granulado sea el papel (cuanto más liso) mejor corre el agua y más grandes son los espacios en blanco. Aquí estaba usando cartulina normal, que es absorvente pero no tanto como el papel de acuarela:
Aquí os muestro la diferencia entre usar la cartulina normal o un papel más liso, como es el smoothy de PaperArtsy. El smoothy crea más zonas en blanco y parece casi un mosaico:
Si usamos un aplicador de fieltro, conseguimos otro acabado. En este caso puse 4 colores de infusions diferentes en el fieltro, pulvericé primero agua y luego alcohol y apliqué esto en cartulina normal (ejemplo Regular Cardstock) y en cartulina con una previa mano de glaze secada (ejemplo Glaze). Repetí esto en otra cartulina también barnizada pero esta vez le puse una gota de pintura dorada acrílica:
Si en lugar de usar fieltro utilizo una esponja, consigo estos otros efectos:
FOIL
En este vídeo os muestro una técnica muy rápida del uso de infusions con foil:
Sólo hace falta pulverizar con agua, secar levemente con un papel de cocina, cubrir con foil y pasarlo 2 o 3 veces por la laminadora para conseguir esto:
DIY MICA SPRAY
En este vídeo os enseño cómo crear vuestro propio spray de mica con Infusions, pearl-ex, una gota de glaze y agua:
En las fotos podéis ver lo que se consigue:
GESSO
En este vídeo os muestro cómo colorear el gesso con infusions:
Y estos son los resultados, aplicándolo directamente con espátula, rebajado un poco con agua y aplicado con pincel, como si fuese una pintura:
PINTURA ACRILICA
En este vídeo os muestro cómo crear vuestra propia pintura acrílica y también cómo conseguir un efecto marmolizado:
Esta es la pintura acrílica DIY comparada con el gesso que hemos hecho en el vídeo anterior, para que veais que son similares:
Y este es el efecto marmolizado. Para hacer esto aplicamos pintura en un bloque acrílico, aplicamos Infusions y pulverizamos agua y después estampamos el papel al bloque acrílico. En este caso utilicé la pintura del bloque tres veces, pulverizando agua y añadiendo un poco más de infusions. Como veis el resultado es bastante aleatorio, a mí me encanta… 🙂
Y esta es la misma técnica pero aplicando la pintura directamente en el papel, luego infusions, luego agua e ir secando con el secador y pulverizando un poquito más para que la pintura corra:
Eso es todo por hoy en All about Infusions. Más vídeos en la parte 2 que llegará en breve. Si queréis que experimente con otras técnicas dejadme un comentario y si las pruebas salen bien, las incorporaré en una siguiente entrega.
Muchas gracias por leer! Hasta el siguiente post!

Me requeteencantan estos polvitos!!!! Cada vez que hablas de ellos me gustan más y más, así que muchas gracias por enseñarnos todas estas técnicas!!!! Ya con ganas de hacer mi muestrario de tags de infusions 😉
LikeLiked by 1 person
Thank you for the instructional videos, really lets us see what this product does.
LikeLiked by 1 person
You’re welcome! Thanks for your comment! Stay tuned because some more will come which will involve using stamps and stencils. Have a lovely evening!
LikeLike
I love the laminator technique. I need to play more with my infusions. You’ve given me some great ideas to try. Thank you. Looking forward to more videos in the future.
LikeLiked by 1 person