

Hi everyone! I’m so happy to share with you my new release of stamps and stencils with PaperArtsy on January 2018 (now available at my Etsy Shop). I’ve gone Nautical Vintage this time, with 3 stamp sets and coordinating stencils about the sea. I’ve also made 3 videos for this release. Go and find them in the blog post. Let me know what you think in the section comments below 😉 Enjoy!
Hola a todos! Estoy muy contenta de compartir con vosotros mis tres nuevos sets de sellos y estenciles (ya disponibles en mi tienda Etsy) que he diseñado para PaperArtsy. Esta es una release marinera de estilo vintage. He hecho 3 videos que podéis ver en el post más abajo. Ya me diréis qué os parece en la sección de comentarios 😉 Espero que os gusten!

En castellano por aquí / Spanish here
In all my releases, there is one image that normally inspires me to create one stamp set. This time, one single image inspired me to create the whole 3 sets, and that was the big seahorse. I imagined my seahorse in a plate full of nautical images, algae, ships, a compass, fish, shells… Obviously I could’t fit all in one plate, so Leandra told me: “Why don’t you do 3 of them?” That was the perfect solution! Otherwise I would still be deciding which images would make it, because I love them all…
Here are all the products in a single image and they are available at my Etsy shop:
With ESC10 you can create beautiful underwater scenes with the fish, the algae and the seabed composition I created. With ESC11 you can go more over the surface of the sea, navigation and sea tales can be recreated with the ships and all the nautical elements. And finally ESC12 brings us curious and interesting creatures that live in the sea and remind me of old myths, so I created a title composition “The History of the Sea” that can be used to introduce these characters. The 3 stencils provide you with some background elements and some titles to pair the stamp sets.
Today there are 2 blog posts to enjoy, from myself now (here and at PaperArtsy blog) and from Marisa (Scrapycia) at 19:30 at her blog and at PaperArtsy blog. Marisa has a beautiful vintage style that I love, so when it was time to choose a wingman I decided to approach her. I was so lucky she said yes! You will be able to see her work with these same products today too. Our blog posts will publish within 30 mins of each other, so the links will be active once published. Stay tuned!
Let’s start with some ideas with each of the new products.
Eclectica³ Scrapcosy Set 10 (ESC10)

‘Fish and Bubbles’ using ESC10
I like the possibility of creating an underwater scene with the different fish and algae. In this case I used the 3 species but you can just use one and stamp it several times to create a bank of fish. In this sample I used all the parts of the stencil PS095 that you’ll see below: I split the title in 3 parts and I added bubbles and the snail using the 2 step stencil.
I love that big eye fish! It makes me laugh all the time :). I created the bubbles applying the reflections first with Grunge Paste and then I created the bubbles with some heavy body gel medium (Prima 3D Matte Gel). I love how these turned out! Specially the one over the buddy in the middle, you can see his fin through the bubble! Isn’t that cool?
Eclectica³ Scrapcosy Set 11 (ESC11)

‘Vintage Sea Tale’ using ESC11
I felt like creating a banner for a sea tale using just Distress Oxide and Grunge Paste. I stamped with Distress Oxide Vintage Photo all the words stamps on the set and smudged them with a foam applicator. With this technique you smudge the pigment and therefore you give colour to your surface but the die stays and lets you see all the details of the stamps (they are a bit blurry because of the water drops I added to make the ink react). The handwriting on these stamps is tiny but they stamp so defined!
I love the Journal title, it can be a main stamp or it can just be used like here, as a background, to add more layers to your project. I love creating shadows when using a stencil. It’s so easy, you just need to do the shadow first (ink layer) and then apply your second layer (grunge paste in this case) shifting the stencil up and left a little bit (so you get your shadow down and right).
Eclectica³ Scrapcosy Set 12 (ESC12)
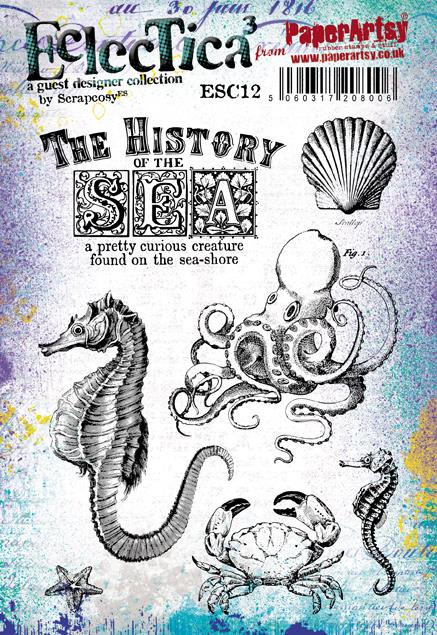
‘The Octopus’ using ESC12
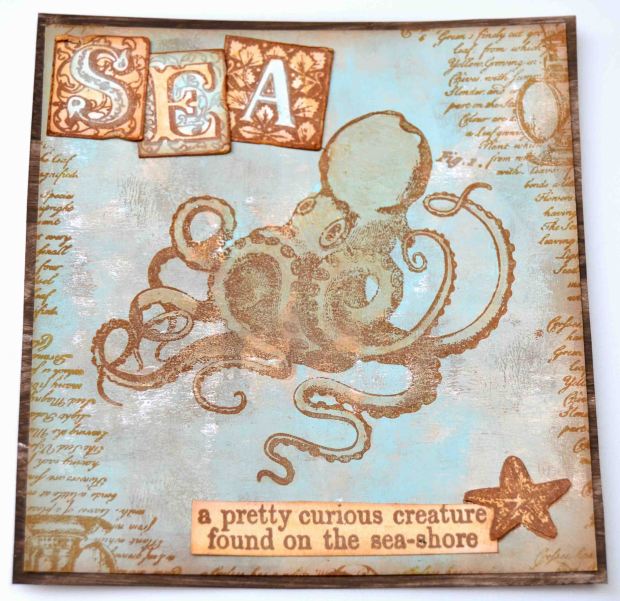
I love the curly tentacles of the octopus. Call me weird, but I find it so cute! I was in love when I found this creature in a vintage book… So I decided to give it a second life by turning it into a stamp, for all of us to enjoy. Look at those eyes!
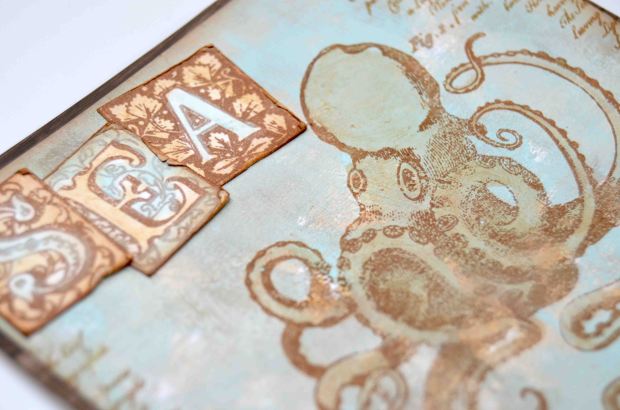
Similarly, the SEA letters were obtained from different books and pages and I incorporated them to the stamp set so they can be used also independently as initials or to be combined with other alphabets you may have to create new words. I decided to cut them and age them to create the title.

You can see how I made this card and another one in the video below, using fresco paints:
PaperArtsy Stencil 093 (PS093)
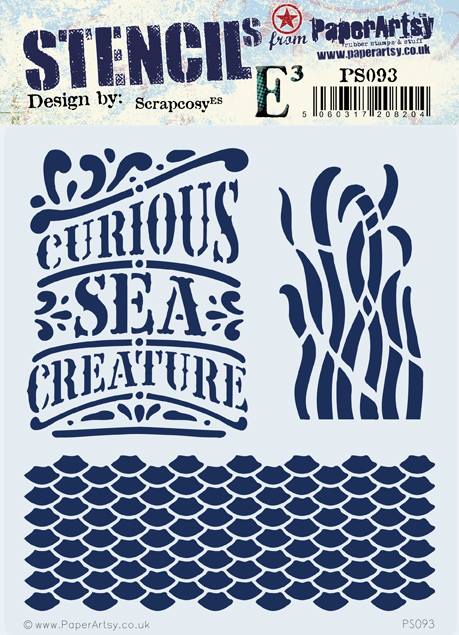
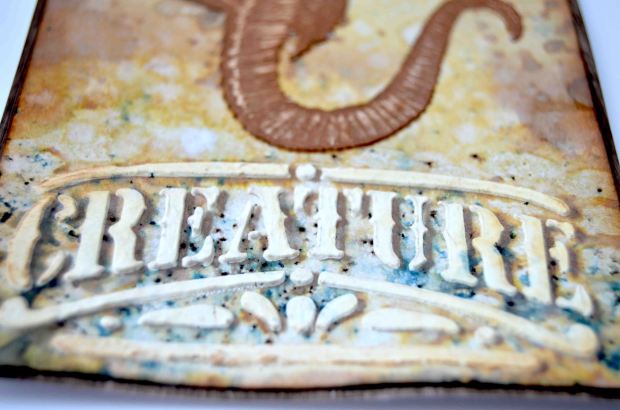
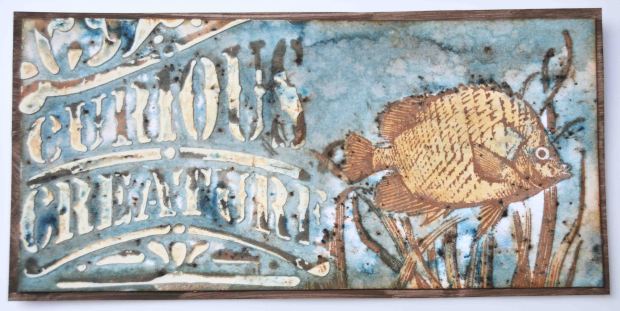
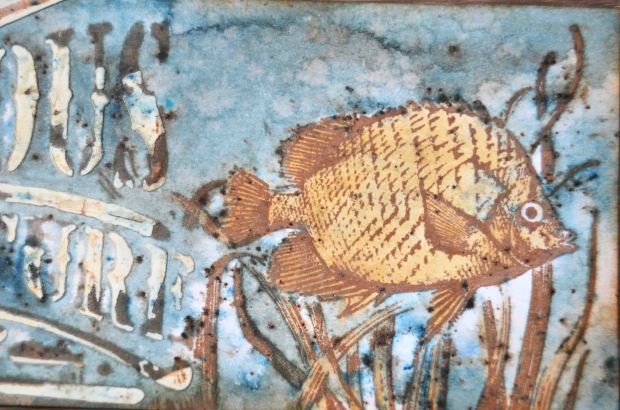
‘Curious Creature’ using Stencil PS093
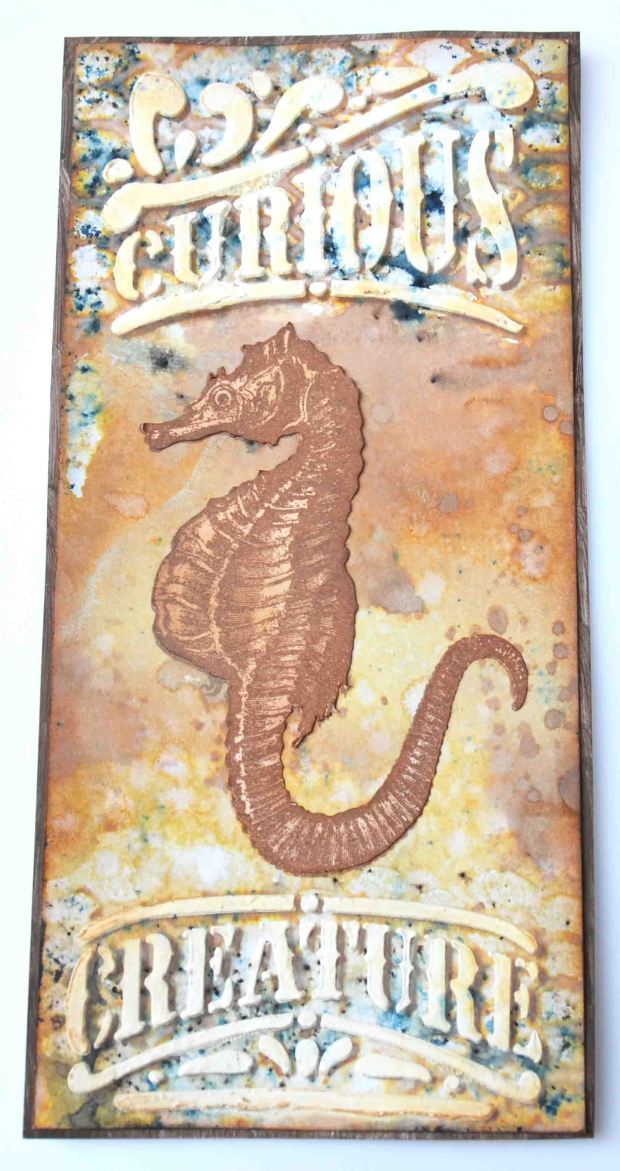
The seahorse has so much detail! It was the creature that inspired everything, so I decided to create this stencil to honor it (although it can be used to frame, title or accompany any other creature). In this case I decided to split the title in two. You can always do this by masking the area of the stencil that you don’t want to use with some masking tape.

I love creating shadows with the stencils. For this project I also used the scales, which you can’t see much here, but they add the texture in the background of the stencilled words and I used some Infusions In the Navy.
Do you want to see how? Watch the video below for more details. The seahorse you see above was stamped, fussy cut and glued on top of the card for more volume and detail.
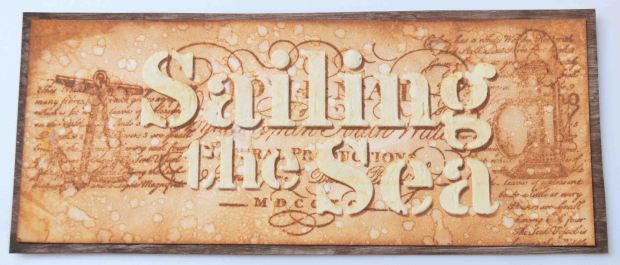
PaperArtsy Stencil 094 (PS094)
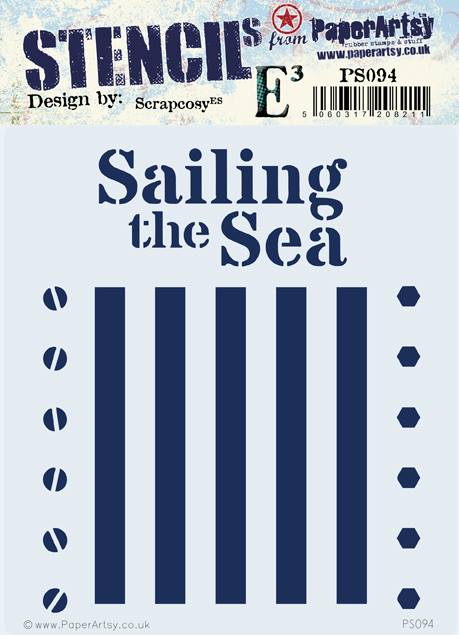
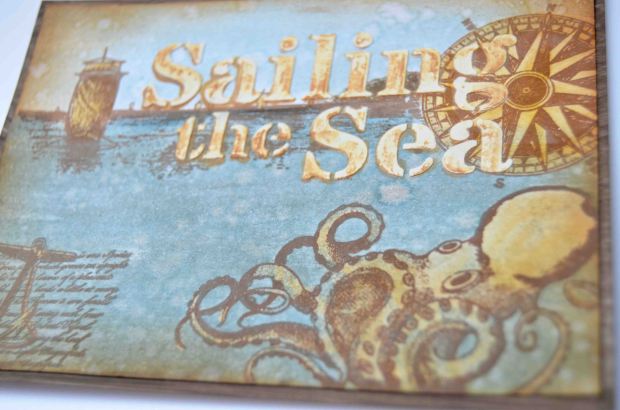
‘Vintage Voyage’ using Stencil PS094

The stencil, in addition to the title, includes some elements that can be incorporated for an industrial or a steampunk touch to your project, like the screws above. Here I used Grunge Paste and some Vintage Photo Distress Oxide on top to colour them, but imagine them painted in a metallic colour or embossed with some metallic embossing powder. The screws can also be added to the vertical bars, they have the same separation so you can add screws over the bars in one go, as if they were screwed to the bars.

I really like the stencil to be on top of the stamped images, it really pops! In this sample you can see the detailed ship of ESC11 which is sailing the sea… These 2 together really match and they remind me of past centuries.

If you want to see how I made this sample, here you have the video. It’s so simple and quick to make it you won’t believe it!
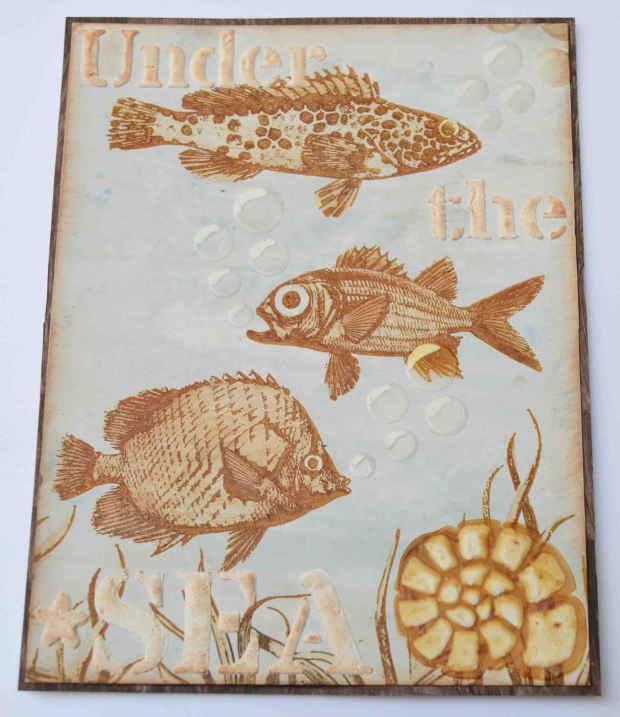
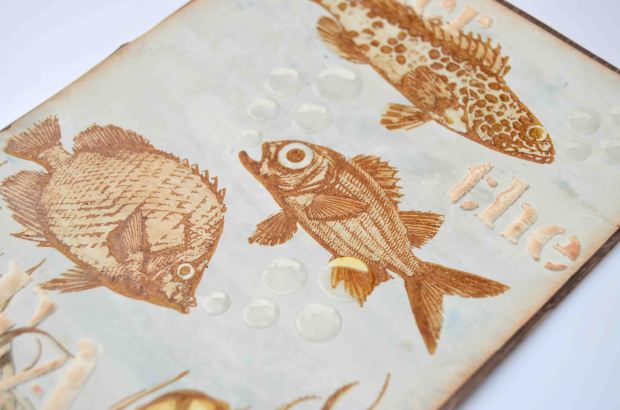
PaperArtsy Stencil 095 (PS095)
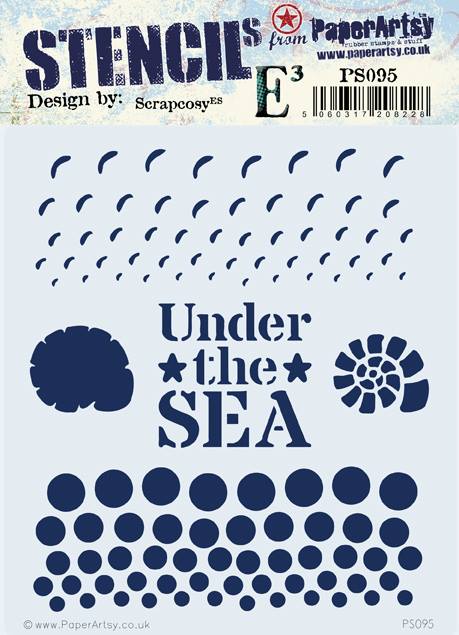
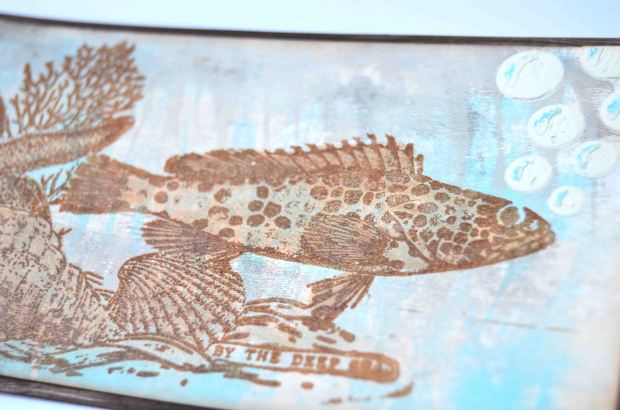
‘Under the Sea, there was a fish’ using Stencil PS095
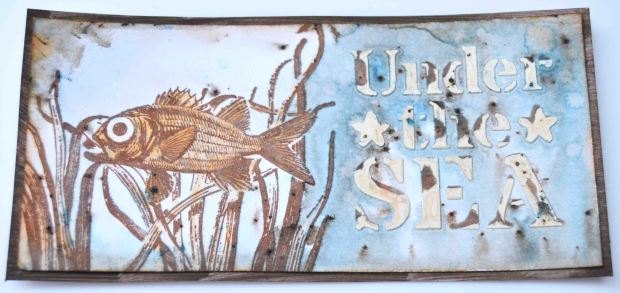
I made the title on this stencil square shaped since I wanted it to be used in tags both vertically and horizontally. In this case, I went for a landscape layout but it would also be very cool as the bottom part of a tag. I used In The Navy Infusions to add that washed out background.
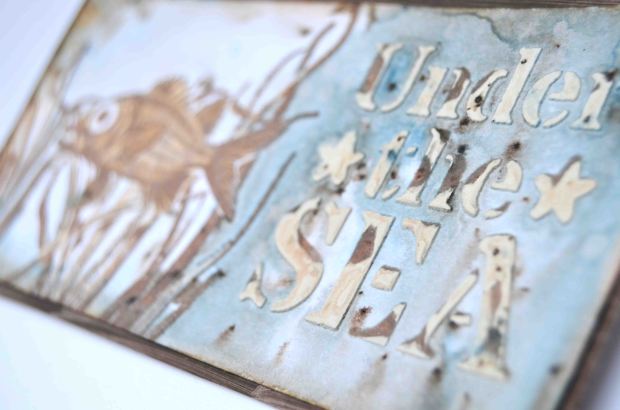
As much as I love creating shadows with stencils, I also love giving a distressed look using them by combining two different materials. For this one I used a first full layer of ink, and then I applied a partial layer of grunge paste, so where you see dark, there is no volume, it’s completely flat, and where you see white, it’s the grunge paste which is bumpy and 3D. I would love repeating this technique and using colours to resemble iron or bronze that has been there under the water for centuries. I guess I could do that by combining dark browns and oranges for the iron, or greens and browns for the bronze patina effect. I’m sure Nikki Acton would nail it!
Additional samples
In addition to the above, I made few other samples, so without much explanation, I’ll share them here. I hope you like them!
‘By the Deep Sea’: The shy fish hides on the seabed, although he will be noticed by the bubbles coming out of its mouth!


‘Curious Fish’: I really love how this fish seems to look directly into your eye, it’s curious to know you!

‘Monster of the Deep’: In this case the octopus is supposed to be a monster of the deep waters. Sailors beware!


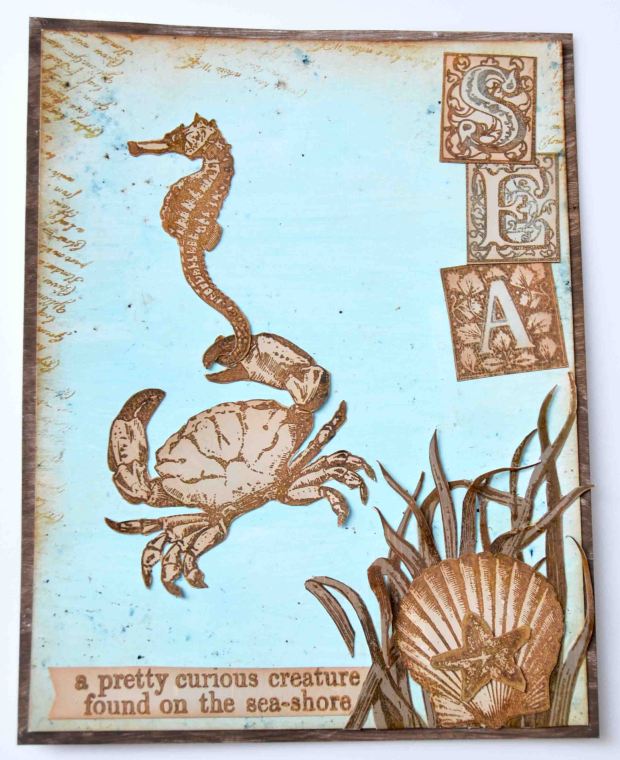
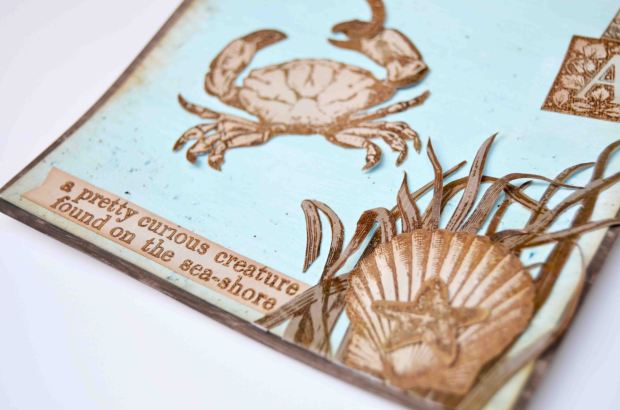
‘Come with me’: Here the little seahorse gives the crab a ride in the waters

I had so much fun playing with the stamps and stencils! I’m so looking forward to create a mini album with them! I did a trip to Seychelles and my camera was set to the lowest quality ever from day 2 of the trip and I realised when I was back in London… so my pictures need to be printed small, so what better solution that creating a mini (very mini) album with them and these great images?
I’m sure I will also use these stamps and stencils in many other projects and art journals, specially after a trip to the beach where I gathered many things from the sand. It feels like summer already even if it’s cold outside!
Thanks for reading till here! If you watched all videos and read everything, it may be now time for Marisa’s post to kick in! Make sure to visit PaperArtsy blog and Marisa’s blog at 19:30 for a second round of inspiration! And feel free to keep in touch in all my social media below, or if you want to get my stamps and stencils, these are now available at my Etsy shop.
See you soon!
Raquel
My socials:
Youtube: https://www.youtube.com/c/scrapcosy
Etsy: https://www.etsy.com/uk/shop/Scrapcosy
Blog: https://scrapcosy.com
Instagram: https://instagram.com/scrapcosy/
Facebook: https://www.facebook.com/scrapcosy
Teaching Schedule:
18/02/2018, CHSI Stitches (PaperArtsy), link to booking info
I hope you liked it! Thanks for reading! And see you soon! 🙂 If you want to send any comments or subscribe, go to the end of the post below
LANZAMIENTO ENERO 2018 – PAPERARTSY – SCRAPCOSY
Normalmente detrás de un set de sellos hay una imagen que me lo ha inspirado. Esta vez, una sola imagen me ha inspirado los tres sets, y esa ha sido el caballito de mar gigante. Me lo imaginaba en una colección llena de imágenes náuticas, algas, barcos, una brújula, peces, conchas… evidentemente no me cabía todo en un único diseño así que Leandra me dijo: “ Y por qué no haces 3?” Pues esa fue la solución perfecta! Porque sino aún estaría seleccionando imágenes para un único set, porque me gustan todas y no sabría cuál descartar…
Aquí están todos los productos en una sola imagen, si queréis alguno, visitad mi tienda Etsy
Con ESC10 puedes crear preciosas escenas acuáticas, con los peces, las algas y la composición de conchas del fondo marino. Con ESC11 pasamos a la superficie del mar, la navegación y las historias marinas pueden ser recreadas con los barcos y los elementos náuticos. El último set, ESC12, nos trae criaturas curiosas e interesantes que viven en el mar y que me recuerdan a antiguos mitos y leyendas de los mares, por eso las acompañé de un título que creé con distintas letras y trozos de aquí y de allí y que dice “The History of the Sea” (La historia del mar) y que se puede usar para dar pie a estos personajes. Finalmente los tres estenciles incluyen algunas partes para crear fondos y también títulos para incorporar en proyectos.
Hoy podréis disfrutar de dos posts donde saldrán mis sellos, el mío (aquí y en PaperArtsy) y el de Marisa (scrapycia) a las 19:30 (también en su blog y en PaperArtsy). Marisa tiene un estilo vintage precioso que me encanta, así que cuando fue el momento de elegir una wingman (compañera para el lanzamiento) decidí preguntarle a ella y me siento súper afortunada de que dijese que sí! Así que hoy también podréis ver su vision a la hora de usar los mismos sellos con los mismos productos. Ella va media hora más tarde que yo, así que atentos, que en cuanto acabéis aquí ya prácticamente le toca a ella!
Empecemos con algunas ideas para cada producto
Eclectica³ Scrapcosy Set 10 (ESC10)
‘Peces y burbujas’ con ESC10
Me encanta la posibilidad de crear una escena acuática con los distintos peces y las algas. En este caso he usado las tres especies de peces, pero si queréis en lugar de eso podéis escoger un único pez y estamparlo varias veces para tener un banco de peces. En esta muestra utilizo todos los elementos del estencil PS095 que veréis después: he separado el título en tres partes y he añadido las burbujas y el caracol con el estencil que se aplica en dos pasos (las burbujas vienen solas y luego tenemos el reflejo y el caracol tiene una base y luego los bultos de la concha en sí)
Adoro al pez del ojo saltón! Me da la risa cada vez que lo veo 🙂 He creado las burbujas en dos pasos: primero aplicando Pasta de textura Grunge Paste a través del estencil para hacer los reflejos y una vez seco, encima he aplicado las burbujas enteras con gel medium (el heavy body, que es más denso, es de Prima y se llama 3D Matte Gel). Me encanta como han quedado, sobretodo la que está encima del pez de en medio, se puede ver su aleta a través de la burbuja. A que mola?
Eclectica³ Scrapcosy Set 11 (ESC11)
‘Historia Marina Vintage’ con ESC11
Me apetecía crear un título para una historia marina usando sólo Distress Oxide y Grunge Paste. Estampé con Distress Oxide Vintage Photo todos los sellos que tienen letras en este set y difuminé la estampación con un aplicador de esponja. Con esta técnica lo que haces es mover la parte que es pigmento de esta tinta y usarla para dar color al papel, mientras que la parte de tinta que es el tinte (dye) queda inamovible en el papel definiendo perfectamente el sello (si están borrosos es porque después apliqué gotas de agua para activar la tinta y crear los gotarrones, es el efecto de las distress). La caligrafía de estos sellos es super pequeña pero se ven tan bien los detalles!
Me encanta el título de Journal, como sello principal queda precioso, pero también se puede usar como aquí, para crear un fondo interesante y darle mas capas a tu proyecto. Me encanta crear sombras con los estenciles. Es tan fácil! Sólo tienes que aplicar primero la sombra (capa de tinta) y luego aplicar la segunda capa (de grunge paste en este caso) pero desplazando un pelín el estencil para la izquierda y para arriba (de esta forma creas sombra abajo y a la derecha).
Eclectica³ Scrapcosy Set 12 (ESC12)
‘La del pulpo’ con ESC12
Me encantan los tentáculos del pulpo, tan rizados. Llamadme rara, pero lo encuentro tan mono! Me enamoré de él en cuanto lo encontré entre los libros… así que decidí darle una segunda vida transformándolo en sello para que todos podamos disfrutarlo. Mirad qué ojos!
Las letras SEA (mar) también las encontré en distintos libros y páginas y decidí incluirlas para que se pudiesen usar independientemente como iniciales o para combinarlas con otro alfabeto que tengáis para crear palabras nuevas. Decidí cortarlas y envejecerlas para hacer este mini título.
Podéis ver cómo hice esta muestra y otra más en este vídeo, donde usé pinturas acrílicas de PaperArtsy (Fresco Paint), técnica de monoprinting y rodillo:
PaperArtsy Stencil 093 (PS093)
‘Curious Creature’ con el estencil PS093
El caballito de mar tiene tanto detalle! Es la criatura que lo inspiró todo, así que decidí crear este estencil en su honor (aunque puede usarse para enmarcar, titular o acompañar cualquier otra criatura, marina o no). En este caso decidí dividir el título en dos. Siempre puedes hacer esto en los estenciles, sólo tienes que añadir cinta adhesiva (como la cinta de carrocero o un poco de washi tape) para tapar las palabras o los elementos que no quieras usar del estencil.
Como ya he dicho antes, me encanta crear sombras con los estenciles. Para este proyecto también usé las escamas que aunque no se ven mucho, dan textura al fondo, y quedan bajo las letras estarcidas. Usé un poco de Infusions In the Navy para esa zona.
Queréis ver cómo lo hice? Aquí os pongo el vídeo para más detalles. El caballito que veis esta estampado, recortado y pegado encima del papel, para más volumen y detalle.
PaperArtsy Stencil 094 (PS094)
‘Vintage Voyage’ con el estencil PS094
Este estencil, además del título y las barras, incluye elementos que se pueden incorporar para darle un toque industrial o steampunk a tus proyectos, como los los tornillos en esta muestra. Aquí he usado pasta de textura grunge paste y un poco de Vintage Photo Distress Oxide para colorearlos, pero imaginadlos pintados de un color metálico o haciendo un embossing con polvos metalizados. Los tornillos también se pueden usar encima de las barras verticales, tienen la misma separación para que podáis dar el efecto de que las barras tienen tornillos.
Me encanta como queda el estencil encima de las imágenes estampadas, resalta mucho! En esta muestra podéis ver todos los detalles del barco del set ESC11 que está surcando los mares… Este sello y el estencil hacen la pareja perfecta y me recuerdan épocas de piratas y navegación en siglos pasados
Si queréis ver cómo hice esta muestra, aquí tenéis el vídeo. Es tan fácil y rápido de hacer que no os lo creeréis!
PaperArtsy Stencil 095 (PS095)
‘El pez bajo el mar’ con el estencil PS095
El título de este estencil tiene forma cuadrada porque quería que se pudiese usar en tags tanto en formato vertical como en horizontal. En este caso, he hecho una muestra apaisada pero también quedaría muy bien en la parte baja de una tag en vertical. He usado Infusions In The Navy para crear el fondo azul aguado.
Además de disfrutar creando sombras con estenciles, también me encanta usarlos con materiales distintos para darle un aire envejecido al diseño. Me explico: en esta muestra he usado tinta para una primera capa (toda entera) y después he aplicado una segunda capa (parcial, o sea, dejando huecos sin cubrir) de pasta de textura Grunge Paste. Lo que consigo es que la parte oscura no tiene ningún relieve y la parte blanca si que sobresale, está en 3D, con lo que parece que está rota y se ha caído a pedazos. Creo que repetiré esta técnica usando colores que recreen hierro o bronce que ha estado bajo el agua durante siglos. Supongo que podría combinar marrones oscuros y naranjas para el hierro y colores verdes y marrones para el bronce y conseguir efecto pátina. Nikki Acton lo bordaría…
Muestras adicionales
Además de hacer una muestra por producto, he hecho otras muestras más. Sin mucha más explicación, aquí las tenéis. Espero que os gusten!
‘By the Deep Sea’: El tímido pez se oculta en el fondo marino, aunque alguien le acabará descubriendo con tanta burbuja saliéndole de la boca!
‘El Pez curioso’: Me encanta que este pez parezca que te mire fijamente de lado, como la Mona Lisa, pero en pez! No te aparta la mirada, y tiene curiosidad por conocerte!
‘Monstruo de las profundidades’: En este caso el pulpo se supone que es un monstruo marino acechando en las profundidades. Cuidado marineros!
‘Ven conmigo’: Aqui el caballito de mar saca al cangrejo a pasear por el fondo del mar
Me lo he pasado tan bien jugando con los sellos y estenciles! Estoy deseando ponerme a montar un mini album con mis fotos del viaje a Seychelles. Y tiene que ser mini, porque no me di cuenta de que la cámara estaba puesta a resolución minima (como 100K por foto) desde el segundo día y hasta que llegamos a Londres, así que pequeñitas y rodeadas de mis nuevos sellos y estenciles, creo que quedará súper mono!
Y ya tengo en mente más proyectos en los que usarlos, art journals, con tesoros recogidos de la playa. Da la sensación que ya llega el verano aunque fuera haga un frío que pela!
Gracias por leer hasta aquí. Si habéis visto todos los vídeos y lo habéis leído todo, ya deben ser casi las 19:30 así que el post de Marisa estara a punto de salir (19:30 hora UK), pasaos por su blog y por el de PaperArtsy si queréis ver sus maravillas con estos sellos y estenciles que podéis comprar ya mismo en mi tienda Etsy.
Hasta pronto!
Raquel
Youtube: https://www.youtube.com/c/scrapcosy
Etsy: https://www.etsy.com/uk/shop/Scrapcosy
Blog: https://scrapcosy.com
Instagram: https://instagram.com/scrapcosy/
Facebook: https://www.facebook.com/scrapcosy
Clases en:
18/02/2018, CHSI Stitches (PaperArtsy), link to booking info

Wow, awesome weblog format! How long have you ever been blogging for? you made blogging look easy. The overall look of your web site is fantastic, as smartly as the content material!
LikeLike
I am now not certain the place you are getting your information, but great topic. I must spend some time learning much more or understanding more. Thank you for great info I was searching for this info for my mission.
LikeLike
I am no longer positive where you are getting your information, however good topic. I needs to spend a while studying more or working out more. Thank you for great info I was searching for this info for my mission.
LikeLike
Raquel, your tags and projects are so beautiful! I believe your stamps are the most unique and detailed I have ever seen. Thank you for sharing your talent with us! So appreciated.
LikeLike