

Hi everyone! Today I’m bringing you my version of bunting (or banner) for this fortnight challenge organised by PaperArtsy which is called Banners & Bunting. Let me know what you think about it! You can participate too and you may win! I’ve done a video! Check it out!
Hola a todos! Hoy is traigo mi versión de banderola para el reto de PaperArtsy de esta quincena que se llama “Topic 6: Banners & Bunting”. A ver qué os parece! Podéis participar también y ganar el premio! El proyecto de hoy va con vídeo, a ver qué os parece!

En castellano por aquí / Spanish here
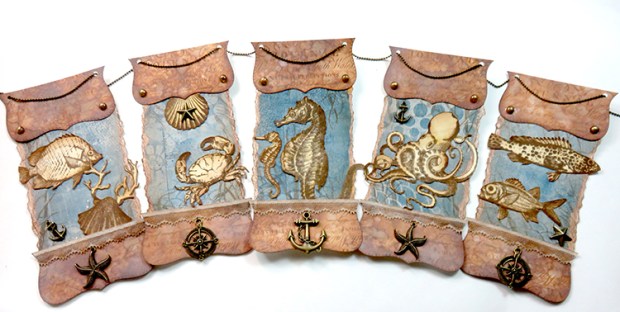
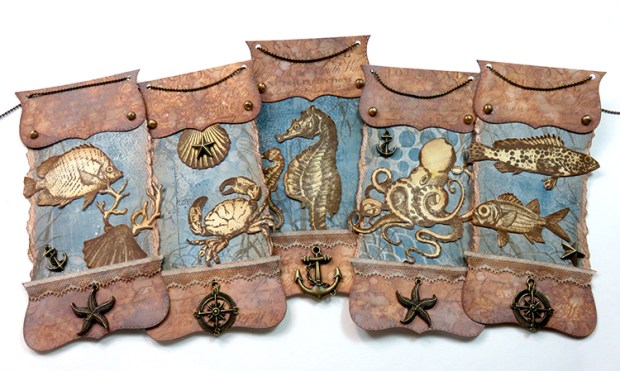
All the buntings I’ve done in the past were made of fabric. This time I wanted to create something different, and I decided to try with paper instead. I’ve mixed many techniques and products today: gelli printing, distress oxides, metallic elements, some lace, embossing powders to create my own brads and, of course, infusions. I’ve used my latest stamps and stencils in a nautical vintage style and this is the result:
Here is the video in case you missed it from the introduction above:
I started with a piece of heavy smoothy paper and gave it a wash with my favourite Infusions colour, golden sands. Then I stamped my images from the sets ESC10 and ESC11 using archival ink Potting Soil.

I fussy cut them all, took me ages, but it was worth it. I started to group my images to see how many pieces my buntings would have. I went for 5 (odd numbers look better generally)

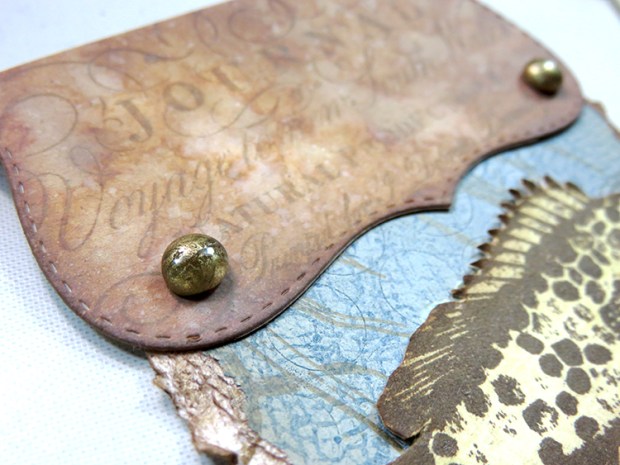
I then moved on to Distress Oxides Walnut stain and Vintage photo, which I applied on a piece of heavy smoothy paper previously stamped with Archival Ink potting soil using one of my stamps in stamp set ESC12. I would use these to create the top and bottom of each piece of bunting.

Then I moved on to gelli printing. I was craving to try this. Some ladies out there were having a 30 day challenge of gelli printing lately and I wanted to play so badly! So I had now an excuse to use it, I would create the background of my bunting with them. I used Fresco Acrylic paints Pea Coat and Buff.

I teared each piece by hand and inked the edges, then I stamped some seaweed.

Now it was time to play with all the elements and see how it would look all together

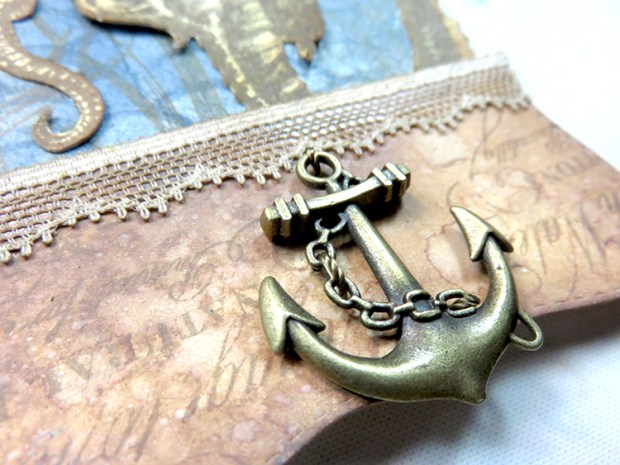
I sew by hand my metallic elements. I don’t like to use glue, I have the feeling that they will fall so I prefer to use thread and needle. And I use a thread that has a metallic look, can you see it? The three stitches are pretty well disguised… The lace was white but I aged it with some infusions golden sands.
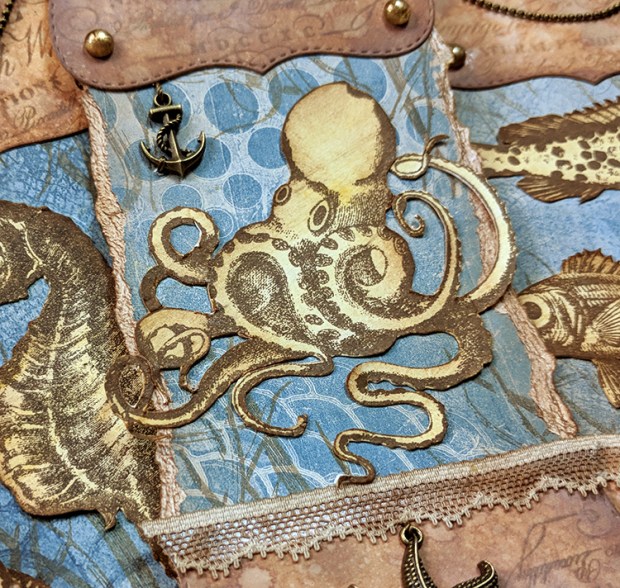
The final touch was to create my own enamel dots using gold wow embossing powder and clear embossing powder. This technique was shared by Marion Emberson (from wow) at Stitches show and it is such a great idea that I wanted to try it myself.

I achieved to create a marble effect, can you appreciate it? Here is a close up:

And with this technique you end up with many, many dots
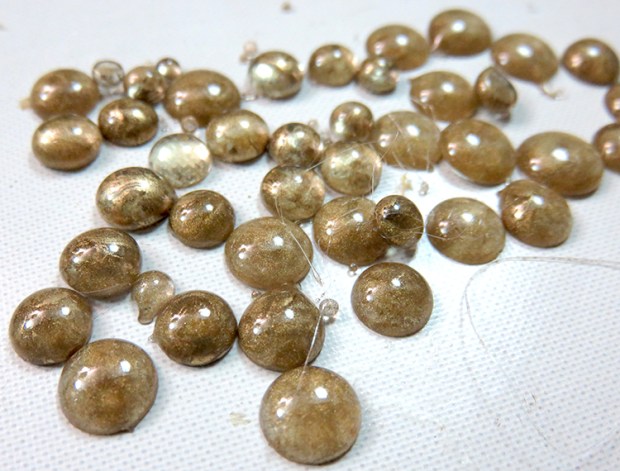
I selected 10 (two for each piece of the bunting), the rest can either be melted or used in a different project

This is how they look in place. I used glossy accents to glue them

I perforated 2 holes and I passed a brass chain through them. This bunting is ready!

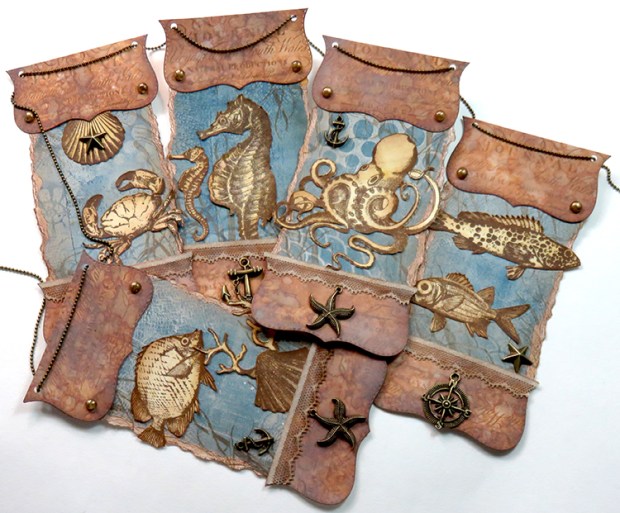
Here are some pictures so you can see all the details

I hope you liked this project. It took me a while to complete it but I was pretty satisfied at the end.
I had lots of fun creating this bunting and it gave me the chance to try different techniques that I don’t normally use. It has been a project that I made after some weeks (that seemed months) of crafty inactivity so it was really hard to start crafting again. But I made it! And now I have other ideas that I would like to explore, like: what about putting some gesso in a piece of fabric and stamping all these sea life on them?
Well, that was all for today, if you want to see more about me and get in touch, here are my details
Youtube: https://www.youtube.com/c/scrapcosy
Etsy: https://www.etsy.com/uk/shop/Scrapcosy
Blog: https://scrapcosy.com
Instagram: https://instagram.com/scrapcosy/
Facebook: https://www.facebook.com/scrapcosy
Or you can meet me in person:
- London – 07/04 & 08/04 – Giving Make and Takes at Ally Pally tomorrow and Sunday
- Barcelona – 14/04 – Teaching at 100×100 Manualidades shop (perfect excuse for you to visit Spain). Available spots only in the afternoon class.
- Paris – 20/04, 21/04 & 22/04 – Giving Make and Takes and Demos at Version Scrap Paris (PaperArtsy booth)
I hope you liked it! Thanks for reading! And see you soon! 🙂 If you want to send any comments or subscribe, go to the end of the post below
BANDEROLA NAUTICA VINTAGE
Todas las banderolas que había hecho hasta la fecha estaban hechas de tela. Esta vez quería usar un material diferente así que me decidí por el papel. He usado bastantes técnicas y productos diferentes hoy: Gelli printing, Distress Oxides, incorporación de elementos metálicos, puntillas, polvos de embossing para crear mis propios brads y por supuesto mis queridas infusions. He usado mis nuevos sellos y estenciles de estilo vintage náutico y este es el resultado:
Por si no habéis visto el vídeo aún, os lo pongo por aquí:
Le di una capa de color a un papel smoothy de PaperArtsy usando Infusions (Golden Sands) con agua y un pincel grueso. Entonces estampé las imágenes de los sets ESC10 y ESC11 con tinta Archival Potting Soil.
Recorté todas las imágenes, tardé la vida, pero valió la pena. A continuación hice grupitos de imágenes para ver cuántas piezas tendría mi banderola. Me decidí por 5 piezas (los números impares suelen quedar mejor)
Entonces pasé a trabajar con las tintas Distress Oxides Walnut Stain y Vintage photo en una hoja de papel Heavy Smoothy que previamente había estampado con tinta Archival Potting Soil usando uno de los sellos de ESC12 (el del título). Usaré este papel para crear las partes superior e inferior de cada pieza de la banderola.
Luego pasé a usar mi gelli plate. Estaba deseando usarla! Algunas chicas estaban participando en el reto de 30 días de gelli printing y me estaban dando envidia, tenía unas ganas locas de jugar con ella! Así que con este proyecto encontré la excusa perfecta: crear el fondo de mi banderola. Usé sólo dos colores de pintura acrílica Fresco: Pea Coat y Buff.
Rasgué cada pieza a mano, entinté los bordes y estampé algunas algas para darle más textura.
Ahora era el momento de probar cómo todos los elementos combinaban, a ver qué tal quedaban juntos
Cosí a mano los elementos metálicos. No me gusta usar pegamento, me da la sensación de que las cosas se acabarán cayendo, así que prefiero recurrir al hilo y aguja. Uso un hilo que parece que es metálico o dorado, se camufla muy bien. Podéis encontrar las tres puntadas que he usado aquí para sujetar el ancla? Para la puntilla he usado Infusions Golden Sands con agua para tintarla de blanco a un color más beige y vintage que me coordine con el resto de cosas.
El toque final fue crear mis falsos brads o mis enamel dots usando polvos de embossing dorados (he usado los de WOW) y UTEE. Esta técnica me la enseñó Marion (la dueña de WOW) en la feria Stitches este febrero y es una idea genial que quería probar en casa.
Conseguí un efecto marmolizado metálico, lo podéis ver?
Y con esta técnica acabas con muchísimos puntitos
Seleccioné 10 (dos para cada pieza de la banderola). El resto se pueden volver a fundir o guardar para otro proyecto
Esta vez use glossy accents a modo de pegamento para ponerlos en su lugar:
Finalmente hice dos agujeros en cada pieza y pasé una cadena dorada por ellos. Banderola lista!
Aquí os dejo más fotos para que veáis más detalles
Espero que os haya gustado este proyecto. Tardé bastante en acabarlo pero al final me gustó mucho el resultado. Vosotros qué opináis?
Yo me lo pasé pipa creando esta banderola y me dio la oportunidad de probar distintas técnicas que no uso habitualmente. Este proyecto también me sirvió para salir de un mini letargo, llevaba tiempo sin crear cosas nuevas, mi creatividad estaba bastante apagada y me costó arrancar, pero parece que lo conseguí y ahora tengo ganas de probar otras cosas, como poner algo de gesso en un trozo de tela y estampar todas estas criaturas en él.
Esto es todo por hoy! Si queréis ver aun más sobre mí, aquí os dejo mis links en las distintas redes sociales:
Youtube: https://www.youtube.com/c/scrapcosy
Etsy: https://www.etsy.com/uk/shop/Scrapcosy
Blog: https://scrapcosy.com
Instagram: https://instagram.com/scrapcosy/
Facebook: https://www.facebook.com/scrapcosy
Y si me queréis conocer en persona, tenéis 3 oportunidades en 3 ciudades distintas este mes (loco mes, este Abril…):
- Londres – 07/04 & 08/04 – Dando Make and Takes y demos en Ally Pally mañana y el domingo
- Barcelona – 14/04 – Taller en la tienda 100×100 Manualidades, quedan algunas plazas para la sesión de la tarde.
- París – 20/04, 21/04 & 22/04 -Dando Make and Takes y demos en Version Scrap Paris (stand de PaperArtsy)
Hasta pronto!

Soooo cool! I am going to do a version of this as an art journal page!
LikeLike