

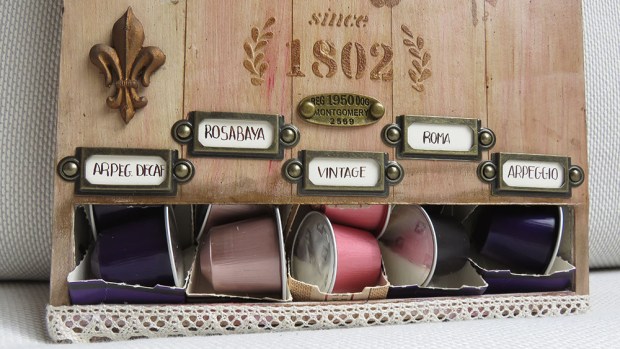
Today I’m bringing you a project that I wanted to do for months: a nespresso capsule holder! And when the topic #7 Found Object was announced by PaperArtsy it seemed the perfect excuse to bring it to live. I’ve incorporated different found objects, some from my stash, like the bulb or the chains and few others created by me like the key hole and filigrees. There is a long video with all the steps below, so get some popcorn or a cup of tea and enjoy! And I’ll be also in PaperArtsy blog with this project.
Hola a todos! Hoy os traigo un proyecto que tenía pendiente de acabar hace meses: un soporte para cápsulas de Nespresso! El reto #7 Found Object de PaperArtsy era la excusa perfecta para ponerme manos a la obra. He incluido varios objetos que tenía por ahí, como la mini-bombilla o las cadenas que uso para hacer collares, y otros objetos que he creado específicamente para este reto, como la cerradura o las filigranas. Hay un vídeo con todos los pasos (en inglés de momento y muy largo), así que pillad unas palomitas o una taza de té y que lo paséis bien! Y si queréis ver más, estoy con este mismo proyecto en el blog de PaperArtsy.

En castellano por aquí / Spanish here
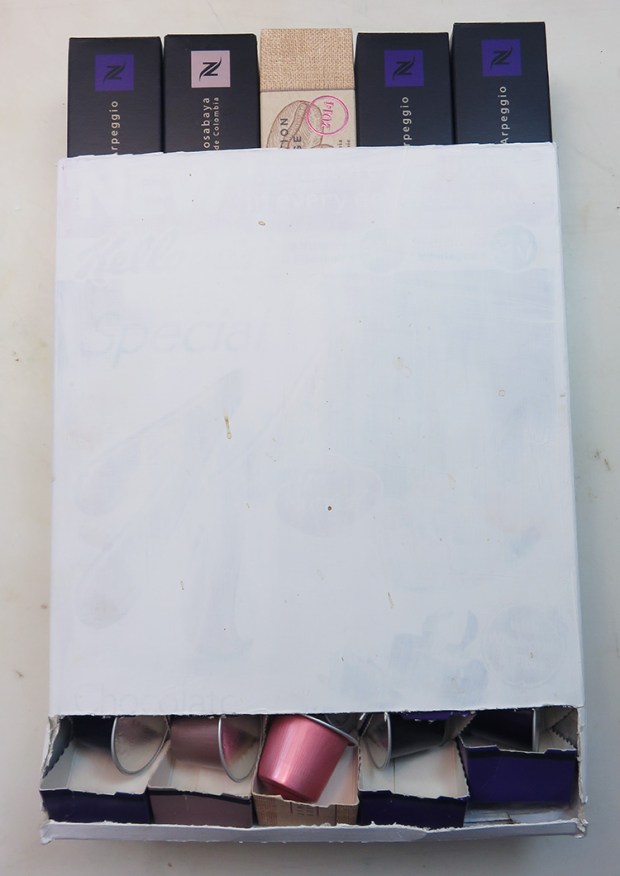
At home I was not the only one craving to get this project done… I had created a card stock base using a cereal box, cut it and resized it to fit 5 boxes of nespresso capsules and painted with white gesso that had been wandering around the kitchen for some time (it was even a bit dirty with coffee splashes… If I had given it a little more time it would have decorated itself completely! hehe) I was being chased by my boyfriend to actually finish it and finally hang it from where it should be. So when the new topic #7 Found Object was announced at PaperArtsy blog, it seemed the right time to complete this project.
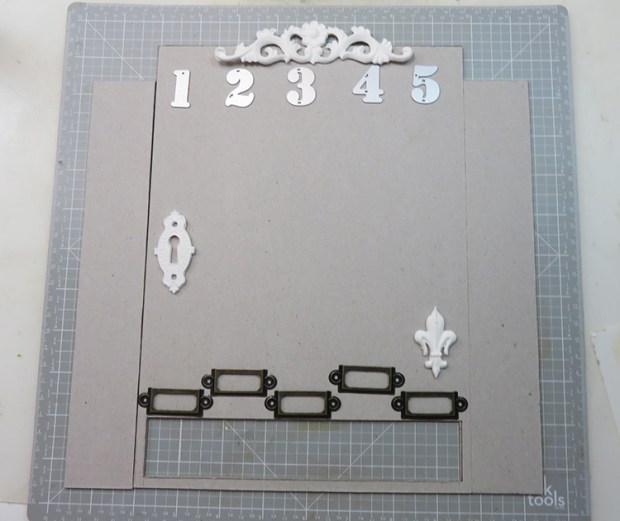
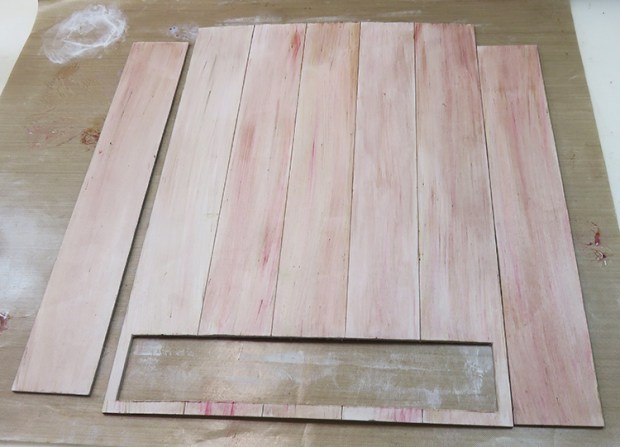
That is the base and to cover it I created 3 panels in grey chipboard. The main one has the measurements written below (you need to cut out and discard the crossed area):

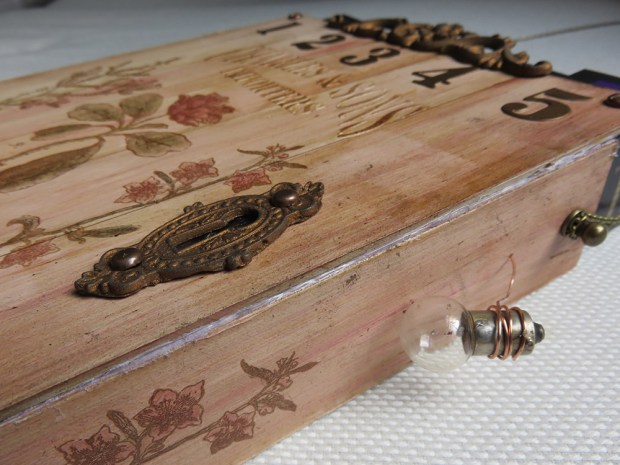
I’ve incorporated different found objects, like the bulb which I kept for some reason (it was so cute and tiny and it seemed it could still work as a bulb) but I never thought I would incorporate it in any crafty project.
I also added a handle for a jewellery box drawer:

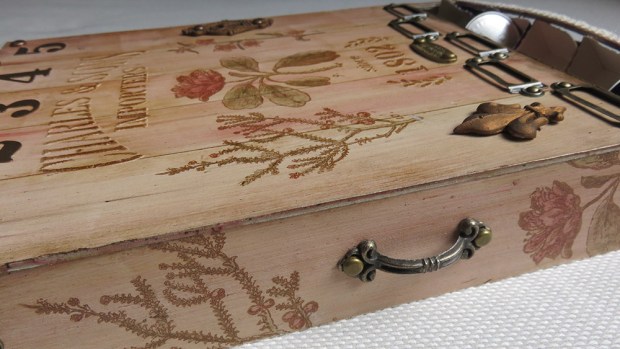
And also some brass chains that I normally use to create jewellery and which help me to hang the capsule holder from the Chicago screws (or however those Tim Holtz’s screws are called…)

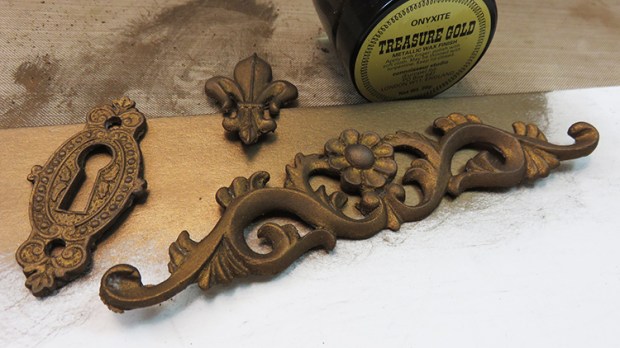
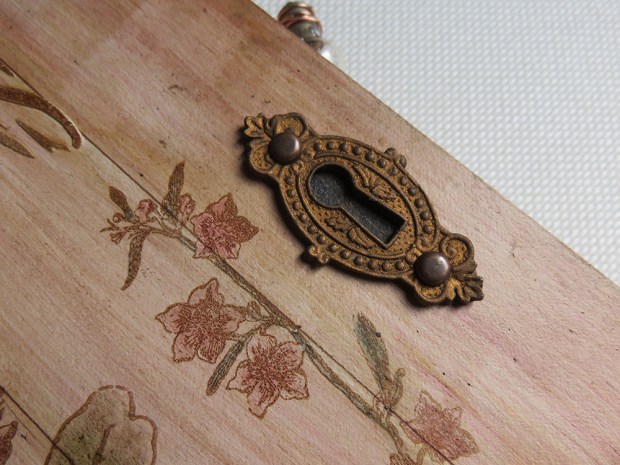
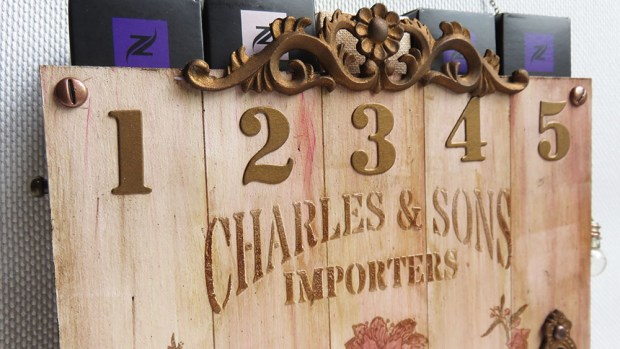
I’ve also incorporated other objects, not found but created by me like the key hole and filigrees.I used some moulds that are actually to create sugar decorations for cakes but they did the trick. I got inspired by Jennie Atkinson in using Paper clay, it was my first time using it and I can tell it will not be the last one. The results are great. I just painted the Paper Clay with some treasure gold onyxite, it seems real metal! And I used treasure golds for the numbers too, I painted a card stock and then I die cut the numbers, they really seem metal and they coordinate with the other elements perfectly.
I originally wanted to create a dark brow background, because this is to hold coffees, but since I’m in love with Rusty Car Infusions and the wood effect that I can create with it, I went for a more light tone and I feel that it was the right choice. I didn’t paint my cereal box directly, I created 3 panels (front and two sides) in grey chip board which I painted with fresco paint Nougat and then decorated it before attaching it to the box. I divided the main front panel in 5 by painting 4 division lines with a permanent fine liner in brown and painted each panel independently with Rusty Car Infusions and Satin Glaze and by masking each section with post it notes, as you may have seen me doing for the crafting at ally pally make and take.
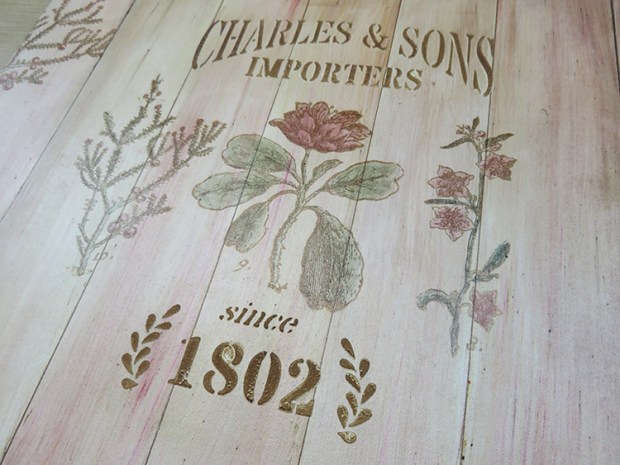
For the main decoration I used my favourite stamp set from my first release with PaperArtsy, ESC03 and its related stencil PS051, which was very convenient for this project, it was about importers of TEA, but for me now it was about coffee, so the part that I stencilled with grunge paste fit just great in the project. Both of them available at my Etsy shop

I painted the stamps (stamped with Versafine ink Vintage Sepia) with a mix of Satin glaze and Infusions (creating my own translucent acrylic paint), I used Olive tree for the leaves and Raspberry mixed with Rusty Car for all the flowers and fruits in the stamps.
This is the before:

This is the after:
When all was dry I put in place all the embellishments and started to poke holes for the brads in the chipboard. Then I used the chipboard as a template to poke holes in the cereal box and then I tried to stick both with modpodge, but I knew I wouldn’t succeed, so that is why I sticked to my original plan of using the brads to keep everything in place. So my brads have a double purpose: decorative (nice metallic touch) and structural (keep my chipboard panels attached to the cereal box)
My bulb is attached in a very simple way, it’s just a copper colour wire that goes around the base of the bulb for a few rounds and then I use that same wire to keep it in a lamp-like position. In this case I just poked the hole in the grey chipboard and using a needle. I passed the wire through the hole and fix it with cello tape to the back of the chipboard. This is then hidden when I stick the chipboard panel to the cereal box.
For the rest of decorations, the filigree, the Fleur de lis and the lace, I used a hot glue gun. And since the gun was still hot, I decided to use it to join the joints properly between the front panel and the side panels.
My capsule holder hangs from the Chicago screws and I used a chain that goes from one side to the other. Then one string goes from the middle of the chain to my wall.
I’ve recorded a video with all the step by step process (except the creation of the base, which is in my blog with measurements, so I don’t overwhelm you here with too many info). This is a very, very long video but if you have time and are curious about how it was done, get some popcorn or a cup of tea, click play and enjoy!
Well, I hope you had fun, you feel inspired and you want to try it yourself. And have a look at the things you collect, I’m sure you have plenty of little items that would look great in a crafty project!
If you want to see more or read more, jump to PaperArtsy blog post about this project too.
I hope you liked it! Thanks for reading! And see you in the next post! 🙂 If you want to send any comments or subscribe, go to the end of the post below
FOUND COFFEE
Yo no era la única en casa que quería ver este proyecto acabado… Hice una base con una caja de cereales que adapté para que cupiesen 5 cajas de Nespresso, la pinté con gesso y la pobre se pasó unos cuantos meses vagabundeando por la cocina y decorándose ella sola a base de manchas de café. Mi novio ya me había repetido un par de veces que a ver si acababa la cajita y la colgábamos de donde toca, así que cuando PaperArtsy anunció el reto #7 Found Object, encontré la excusa perfecta.
Lo de arriba era la base y para cubrirla y que quede más robusta corté 3 paneles en chipboard or cartón gris duro. El frontal tiene las medidas escritas abajo (tienes que cortar lo que está rallado):
He incorporado objetos que fui encontrando por ahí, como la mini-bombilla, que por alguna extraña razón se cruzó en mi camino y la guardé (y eso que no tengo nada que necesite una bombilla tan pequeña!), no pensé que la utilizaría en ningún proyecto y mira por dónde! Y lo mejor de todo, es que creo que funciona… como algún día me dé la vena, capaz soy de ponerle una pila a mi dispensador para acabar teniendo luz!
También incluí una maneta de esas que se ponen en joyeros o mueblecitos muy pequeños:
Y unas cadenas que uso normalmente para hacer collares pero que en este caso me ayudarán a colgar mi dispensador de cápsulas junto con el par de tornillos de Tim Holtz
También he incorporado otros objetos, no encontrados sino creados por mí, como la cerradura o el arabesco. Utilizando moldes de cocina para decoración de pasteles y un poco de Paper clay (pasta de modelar de papel) conseguí que mis figuras en blanco, al pintarlas con treasure gold se transformasen en objetos metálicos. También pinté una cartulina de 300gsm de color crema con Treasure Gold para poder cortar mis números en dorado y que coordinen con el resto de elementos.
Mi idea inicial era pintar el dispensador en un color marrón oscuro, ya que iba de cafés, pero como resulta que me encanta el Infusions Rusty Car y el efecto que consigo con él de falsa madera, decidí ir a por ese acabado y creo que fue una buena decisión. No pinté mi caja de cereales directamente (es mi base) sino que creé tres paneles en chipboard (ese cartón gris oscuro duro) que pinté con pintura acrílica blanca/crema, Nougat Fresco Paint, luego los decoré y finalmente los fijé a la caja de cereales. Así queda más robusto el dispensador. Dividí el panel principal en 5 secciones dibujando 4 líneas divisorias con puntafina marrón permanente (resistente al agua) y pinté cada sección con Infusions Rusty Car y con barniz Satin Glaze. Para pintar cada sección independientemente usé post its para cubrir aquello que no quería pintar. Es la misma técnica que use para mi post anterior sobre el make and take que di en la feria Crafting at Ally Pally.
Para el panel frontal utilicé el set de sellos que últimamente se ha convertido en mi favorito de los tres que lancé con PaperArtsy en febrero de 2017: ESC03. También utilicé el estencil a juego PS051 que aunque va de importadores de té y no de café, sigue yendo como anillo al dedo para este proyecto. Podéis encontrar ambos disponibles a la venta en mi tienda Etsy
La parte del estencil está hecha con grunge paste que una vez seca he entintado con tinta marrón (inicialmente vintage photo distress, pero luego puse un poco de vintage sepia para que cuadrase con la tinta de los sellos.
Una vez estampadas mis imágenes con tinta Versafine Vintage Sepia, que es permanente y resistente al agua, usé una mezcla de Infusions con Satin glaze para crear mi propia pintura translúcida acrílica. Pinté las hojas y los tallos de las plantas con Infusions Olive Tree y para los pétalos y bayas utilicé una mezcla de Raspberry con Rusty Car, para tener un rosa amarronado.
Una vez todo estuvo seco, puse las decoraciones en su sitio y me dediqué a marcar con un lápiz dónde iban los agujeros, que luego perforé con la ayuda de un punzón. Los brads (encuadernadores) tienen que pasar el grosor del chipboard, así que tuve que hacer agujeros bastante grandes. Luego usé el chipboard como plantilla para marcar de nuevo agujeros a hacer con el lápiz sobre mi base (caja de cereales). A continuación, y más bien con poca fe, intenté dar una capa de modpogde a la caja de cereales para poder pegar encima el frontal, pero evidentemente, aquello no enganchaba lo suficiente, así que seguí con mi plan original de usar los brads con doble función, para decorar y para fijar los paneles a la base.
Mi bombilla se sujeta de una forma muy sencilla: con un trozo de alambre de color cobre (que me regaló mi amiga Aida) le dí varias vueltas a la base de la bombilla, a modo de portalámparas y ese mismo alambre es el que me hace de lámpara y se esconde entre el panel y la caja de cereales. Le hice un mini-agujero con una aguja al panel y pasé el alambre a través de él y por el otro lado fijé el alambre con un celo a la parte de detrás del panel. De esta forma queda escondido y no se ve ni se moverá cuando meta mis cajas de cápsulas.
Para el resto de decoraciones, el arabesco, la flor de lis y la puntilla, utilicé una pistola de pegamento caliente y aproveché a usar este pegamento también para fijar las esquinas entre los paneles laterales y el panel frontal, así quedaba todo más robusto.
Mi dispensador de cápsulas cuelga de dos tornillos que están unidos a través de una cadena que se puede quitar y poner. Como en este país una no puede hacer agujeros en las paredes y menos en los muebles de su casa de alquiler, pues en lugar de colgar la cadena de una alcayata en la pared, tuve que ingeniármelas de otra forma para que el tema fuese reposicionable: la cadena cuelga de un un cordel que llega hasta una U metálica (dos eles metálicas unidas mediante un tornillo… en fin, sin comentarios…) que a modo de gancho me deja colgarlo de cualquier cornisa de los muebles de la cocina sin hacer un solo desperfecto. Aunque estoy orgullosa de mi U, me la guardo para mí, no tiene mucho valor artístico, la verdad… 🙂
Y porque un vídeo vale más que mil explicaciones, dadle al play si queréis ver como lo hice de principio a fin (excepto la base, que ya la tenía hecha). Aviso, es un vídeo muy largo, pero pasa todo muy rápido, así que yo me haría unas palomitas o una taza de té y a disfrutar!
Y si aún no os he aburrido suficiente, podéis ir al blog de PaperArtsy donde hoy presento este proyecto.

Oh me encanta. Muuuuuy chulo.
Cada vez haces cosas mas bonitas.
Un beso
LikeLiked by 1 person
Gracias!! 🙂
LikeLike
Very good wood panel effect, and now you have shown how you can make something practical and useful out of an empty cereal box! Very arty and practical, and helps to serve your caffeine addiction. Disappointed the bulb did not switch on!😊
LikeLiked by 1 person
Thanks Dan! Happy you enjoyed it! Now it’s your turn to make one! 😛
LikeLike
My neighbour won’t be too happy when he wakes up in the morning to find half of his fence has vanished, to replaced with little box dispensing Instant Coffee 😁
Best leave it to the artistic expert!
LikeLike
I love this! So very clever and artistic.
LikeLiked by 1 person
Thanks very much!!
LikeLike