

Hi everyone! Today I’ll share with you the make and take that I prepared for Stevenage and for Crafting at Ally Pally. They are 3 tags in which I use my stamps and stencils from the second release with PaperArtsy this summer, infusions by PaperArtsy and Distress Oxides by Tim Holtz. Let’s get started!
Hola a todos! Hoy comparto con vosotros el make and take (mini taller) que preparé para la feria de Stevenage y para la feria Crafting at Ally Pally en septiembre de 2017. Son unas tags (etiquetas) en las que utilizo los segundos sets de sellos que saqué con PaperArtsy este verano y también utilizo Infusions de PaperArtsy y Distress Oxides de Tim Holtz. Espero que os guste!

En castellano por aquí / Spanish here
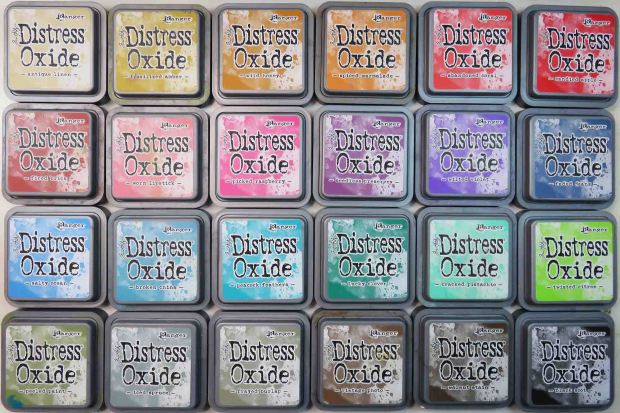
In June I released my second sets of stamps and stencils and in September I was working in the samples for the third release already. At that time I got in touch with Leandra for a completely different issue and I ended up being offered to prepare a make and take for Stevenage which was one week away or less! With oxides! I was over the moon! The next day she sent me the entire distress oxides palette, 24 colours to play with. It was like Christmas day for me! So I started to play.
Since both distress oxides and Infusions react with water, I wanted to mix them and use them in the same project and I believe that combining these products in these techniques works very well.
Note that in the make and take we can’t use heat tool, so if you repeat the same steps at home with a heat tool instead of a paper towel, you will get more vibrant colours of infusions and distress oxides and also, you will be able to get more dramatic oxide effects with the inks. But still, you’ll see that with a paper towel you get great results.

The second note is that a make and take needs to happen in to 20-25 minutes, so we don’t take too much time from the people doing it (they are in a craft fair, and of course they came also to see other stalls and things!) so as you can imagine, between my explanations, if I do things first and they repeat, the steps have to be quick and easy. Each make and take should take me alone 10 minutes or less to execute, otherwise it will be too long. So believe it or not, once you repeat these tags many, many times, each of these finally took me around 5 to 7 minutes start to end, so it is a very quick and striking project, I would say
You can see all the details in the video below:
But by way of summary, here are all the steps and supplies:
1 – first I used 2 colours of infusions to sprinkle on my tag, activated with few spritzes of water to create an initial background, and dried with paper towel (you can see below that in the end project, the infusions are still seen through the layers)

2 – then we use distress oxides in the craft sheet: apply three horizontal stripes (keeping the gap between stripes to a minimum) and keep the clearer colour in the middle, since we will stamp on it. Spritz with water the ink until you see droplets, then face tag down and flat on surface and lift. Dry with paper towel and when dry, re-activate ink with droplets of water and dry again.
3 – reapply oxides in the borders and the areas that may not be fully covered using a cut-n-dry square foam inked and apply in circular motion
4 – Reactivate ink again with droplets and dry. Repeat this until satisfied. The longer you leave the droplets to air dry, the more dramatic effect you’ll get
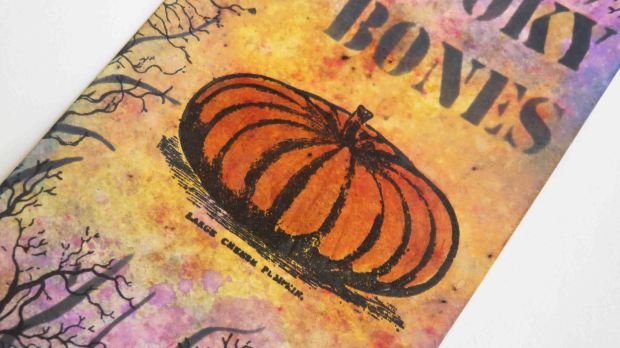
5 – At this point you should be satisfied with your background, so we will start adding elements: first with the 4th distress oxide colour (the darker one which for the rose tag is Fired Brick, for the mushroom tag is Walnut Stain and for the Halloween tag is the Slack Soot) ink up a cut-n-dry square foam and apply through the stencil in circular motion to create a border on bottom, left and top of the tag using the brickwork (rose), the honeycomb (mushroom) and the branches (Halloween) and also choose a word from the stencil and place it as a title with same technique

6 – Time for stamping: stamp on top of the stencilled area the background stamp: words (rose), leaves (mushroom) or tree branches (Halloween).

7 – Stamp the main image and then colour with a mix of glaze and infusions well dissolved.

Here is the list of supplies that I used:
ROSE TAG

INFUSIONS:
Distress Oxides:
MUSHROOM TAG
INFUSIONS:
Distress Oxides:
HALLOWEEN TAG
INFUSIONS:
Distress Oxides:
I hope you liked it! Thanks for reading! And see you soon! 🙂 If you want to send any comments or subscribe, go to the end of the post below
MAKE AND TAKE – DISTRESS OXIDES AND INFUSIONS
En junio saqué mi segunda release de sellos y estenciles y en septiembre ya estaba trabajando en crear muestras para la tercera release. En ese momento me puse en contacto con Leandra por una historia completamente diferente que acabo en una oferta para dar un mini taller (make and take) en la feria de Stevenage! Usando las (ya no tan) nuevas distress oxides! Estaba con una sonrisa de oreja a oreja, feliz como una perdiz! Al siguiente día me llegó un paquete con los 24 colores de distress, parecía que acababan de llegar los Reyes Magos, así que me puse a jugar, como lo requería la ocasión 🙂
Quería combinar los dos productos y usarlos en el mismo proyecto, pero como los dos reaccionan con agua, tenía que pensar bien las técnicas a usar. Creo que al final han quedado unos proyectos muy resultones y que son muy rápidos de hacer.
Tened en cuenta que en los make and takes no disponemos de pistola de calor para secar entre capas, así que sólo podía recurrir al papel absorbente para ese propósito. Si probáis el proyecto en casa y tenéis pistola de calor, los colores os quedarán más vivos y podréis conseguir un efecto “oxide” más dramático con las distress. Aún y así, secando con el papel se obtienen resultados muy chulos.
El segundo punto a tener en cuenta es que el mini taller no puede durar más de 20-25 minutos, porque tampoco les quiero robar mucho más tiempo a los que atiendan, ya que están en una feria de scrap y también han venido a ver otras cosas! Faltaría más! O sea, que en realidad he de preparar un taller que a mí me cueste menos de 10 minutos de hacer. Al final, después de todas las prácticas y de repetir muchas, muchas veces, para hacer una de estas tags se tarda entre 5 y 7 minutos, así que es un proyecto muy rápido una vez le coges el tranquillo y creo que queda muy bien.
Podéis ver todos los detalles en el vídeo a continuación:
A modo de resumen estos son los pasos y los materiales que he usado:
1 – Primero utilizo dos colores de infusions, se esparcen por encima de la tarjeta y se activan pulverizando agua. Secamos con un papel absorbente (como podéis ver, en el proyecto final, los infusions se intuyen de fondo, contribuyendo a darle más interés)
2 – Usamos las distress oxides sobre la “craft sheet” pintando tres franjas paralelas (lo más juntas que se pueda pero sin manchar los ink pads. En el medio uso el color más claro porque en este es en el que estamparemos. Se pulverizan las franjas para activar la tinta (hasta que se vean gotitas de color) y se aplica encima la tarjeta, que haga buen contacto con la superficie, levantar, secar con papel y una vez seco, dejar caer gotitas de agua para reactivar la tinta y crear efecto “oxide”
3 – Reaplicar más tinta distress con aplicadores de tinta (en este caso estoy usando cut-n-dry que es una espuma que puedes cortar en la forma que quieras) usando movimiento circular y aplicando en los bordes y en las zonas que hayan quedado por pintar o que queráis cambiar de color, ya que las distress oxides son opacas y una capa se puede cubrir con otra (o sea, si aplicas amarillo sobre azul no obtienes verde, obtienes amarillo)
4 – Reactivar la tinta de nuevo con más gotitas de agua y volver a secar. Repetir esto tantas veces como se quiera, hasta que te guste el fondo. Cuanto más se dejen las gotas de agua sin secar y actuando, más impactante será el efecto oxide.
5 – En este punto ya deberíamos tener un fondo bien bonito, así que es hora de añadir elementos: primero elegimos el cuarto color de distress, el más oscuro (que para el modelo de la rosa es Fired Brick, para la seta es Walnut Stain y para Halloween es Black Soot) y con un aplicador, haciendo movimientos circulares a través del estencil decoramos la parte de abajo, izquierda y arriba de la tarjeta: para la rosa creamos un muro de ladrillo, reposicionando el estencil; para la seta creamos un fondo de panal de abeja, de nuevo reposicionando el estencil y para Halloween usamos las ramas. Con la misma técnica aplicamos un título a nuestra tarjeta (The rose, Autumn y Spooky Bones para cada modelo de tarjeta)
6 – Toca estampar: Usamos los sellos de fondo encima de la parte donde hemos aplicado de estencil, para la rosa usamos el texto, para la seta usamos la rama con hojas y para Halloween usamos las ramas
7 – Finalmente estampamos la imagen principal y la coloreamos usando una mezcla de una gotita de glaze (barniz) con una pizca de nada de infusions, bien disuelto.
Esta es la lista de materiales que he usado:
ROSE TAG
INFUSIONS:
Distress Oxides:
MUSHROOM TAG
INFUSIONS:
Distress Oxides:
HALLOWEEN TAG
INFUSIONS:
Distress Oxides:
Muchas gracias por leer hasta aquí! Espero que os haya gustado y hasta el siguiente Post! Si queréis dejarme un comentario me alegrará mucho leerlo 🙂

Me encanta como siempre, Felicidades
LikeLiked by 1 person
Gracias!! 🙂
LikeLike