

Hi everyone! Today it’s a very special night for me, it is my third release of stamps and stencils for PaperArtsy and I can’t be happier! This release is about Christmas! And although it’s September, after going crazy creating all these samples I feel it’s Christmas already. Did I say I went crazy? Yes, I could’t stop myself from creating different things with all the stamps and stencils on the release: I created a Christmas panel, a calendar, a bunch of cards and a bunch of tags (see the video on how to create few of these tags). Make sure to visit the PaperArtsy blog as well, so you can see more details about the release.
Hola a todos! Hoy es una noche muy especial para mí, es el lanzamiento de mis nuevos sellos y estenciles que he sacado con PaperArtsy y estoy encantada! Estos sellos van de Navidad! Aunque estemos en septiembre, después de crear muestras como una loca ya me da la sensación de que las Navidades están a la vuelta de la esquina, sobretodo aquí en Londres que hace un frío que pela! Pues me emocioné tanto con los sellos que he hecho de todo: un cartel de Navidad, un calendario, un montón de tarjetas y un montón de tags y aunque tengo vídeos de todas las cositas, hoy sólo vais a poder ver vídeo de unas pocas muestras, que sino nos dan las uvas! Eso sí, del resto podéis ver todas las fotos que queráis. Ya me diréis qué os parecen mis nuevos sellos y estenciles en la sección de comentarios de abajo (por cierto, ya están disponibles en mi tienda Etsy, para las que no os podáis resistir! 😉 Espero que os gusten!

En castellano por aquí / Spanish here
Christmas is that time of year when most of us (crafters) are busier, creating handmade Christmas cards, preparing hand made presents, maybe even creating handmade presents for other people as well. It’s hard, it takes time, but we love it. Designing stamps and stencils for Christmas time, was not easy either, but I’m super happy with the result and my mind is in the season already. Winter is coming!
So let me introduce you my winter team for 2017!
ESC07 – Winter Flora and Fauna
As you know I love botanical images, so I was looking for some emblematic ones, and what could be better than a holly, a pine tree and a pine cone? And then I found the deer and I fell in love with him. For me, he is the star of the stamp set, so I had to place it in the middle 🙂 And in order to make quick and easy cards or tags, I included a nice sentiment in a font that I love and that doesn’t need much decoration.

PS073 – Let it snow
I wanted to create a stencil that had nice sentiments, snowflakes and dots, because I wanted to create tags and postcards with it. I really enjoyed using my stencil PS064 that I released in July so I wanted a similar style but winter themed. And my view was using it with ESC07 above.

ESC08 – Vintage Christmas Baubles
You know I love curating images from old books and documents and when you have in mind a specific thing (a type of flower or plant) and you find the perfect one, it is great! However, for this set, it was impossible, I couldn’t find what I had in mind. No books would have my ornaments. So I thought I had to change my strategy: why not drawing it myself, replicating an old vintage style. I even started a drawing course from an old book to try and draw like them, in the 18th century. So finally I draw these, I was not 100% convinced I even was about to not showing them to Mark and Leandra but I thought, why not? I sent them along the rest, and guess what, they liked them! I couldn’t believe it! So here they are, ready to decorate your cards, your tags or even your tree!

PS072 – Christmas Wreath
Believe it or not, this stencil came to life by chance. I designed the basic baroque filigree and I was trying to fill the entire stencil with it, in different positions and arrangements, to create a seamless baroque pattern. However filling in the gaps was more difficult that what I expected, so I decided to place each figure close to the other but slightly angled. At the end the figure closed itself into a circle and I thought that I would put another piece in the centre of it. It didn’t fit, it didn’t look right, I came back to the circle and had a second look and I just loved how it looked, so simple. So I just added a curved Merry Christmas on top (because I loved using my PS050 and PS051, Vegetables and Importers titles in the past) and PS072 was born. And you know what? Despite it being a circle, I’ve been able to use the wreath as a seamless pattern, and this is because you normally use a background as a… background, i.e., as something in the back for a focal point, so basically I used it around a stamped image and having the empty gap in the centre actually helped:)

ESC09 – Vintage Frames
On my first release, when I launched ESC03 (Voyager) I fell in love with the vintage frames that you can find in old maps, so this idea was always in my mind: creating a stamp set of empty frames and coordinating sentiments, so you can mix and match. And I’m so happy I finally did it! You would think that you can’t do much with these, but let me tell you that I don’t know why but this set has really got me and I had lots of ideas that I wanted to try, as you will see in the many samples I’ve created below. Also, you’ll find the sentiments I selected very useful: A Merry Christmas, a Happy Birthday and a Thank You. All of them in the same font and all of them fit in the frames. And additionally I included an L shaped frame which I believe will be very good to use. Today’s video is about the use of this stamp set

PS074 – Diamonds and baroque stripe
I I had in my stash a stencil from another brand which had worn diamonds and I found a very nice use for it as you will see in the distress samples below. However, I wanted a not-worn pattern (you can always alter it and use it differently so it seems worn if you need to, as you will also see today) and use it to create seamless patterns (it seems I’m obsessed with creating seamless patterns, perhaps I am… like in PS PS064, where I created a brickwork 100% extendable in all directions. I think it’s important that you can use a stencil in a surface as much as you need. The other day at Stevenage I had one lady at my Make And Take who precisely wanted a stencil to create her own backgrounds on her scrapbook pages, and of course I would recommend a big stencil (12 by 12) but sometimes these are too big to store and a smaller stencil like this one, can do the work and it even has 2 patterns in one. The baroque stripe can also be used to cover a large surface as well as a small one. I’ve used this stencil a lot, and I think it will become one of my always go-to stencils.

PS071 – Calendar
When I created ESC09 I had in my mind a project about creating my own calendar, so I thought it would be a good idea to have a stencil with months and numbers. If you do art journals and you like to date them, you can also find it useful. And finally, if you want to create a title for your Trips, Notes or Books, you can use the related wording.

And now I’ll show you the samples I’ve made using all these. And I’ll share a video on some of the tags that I’ve created for this release.
Winter tags
With ESC07 (Winter Flora and Fauna stamp set) and PS073 (Let it snow stencil). When I give a present I like to wrap it in kraft paper, but then I also like to tie some baker twine and add a tag with the name of the person I’m giving the gift to. So I felt I needed to create some tags with that in mind.

I love the fact that the pines can be stamped at different highs so you can create your own scenery. Imagine their branches a bit covered in snow! I was about to do it, but I preferred that this time the stars would be the sentiments which just pop and have a great texture. I’ll show you some more close up photos of these:
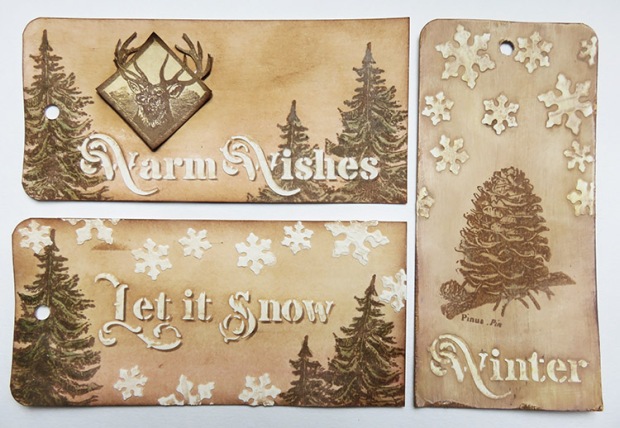
Here my deer just wants to jump and run in the forest, don’t you think? I bended the corners to give it a bit more of volume.

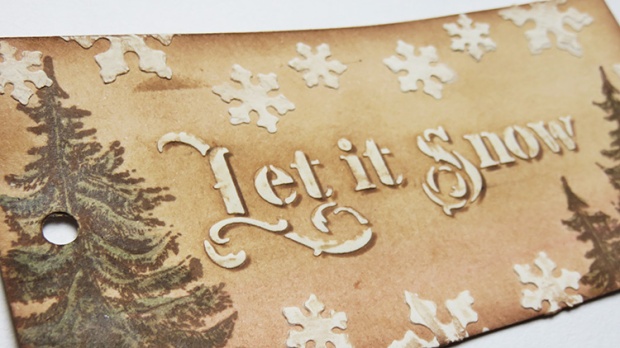
And with the sentiment Let it snow, I felt I needed snowflakes all around it.
For this last one, I just wanted to colour and have fun and see how my holly would look when coloured with my favourite technique: infusions and glaze. And I think it looks very nice and very Christmassy, so I was very happy with this one.

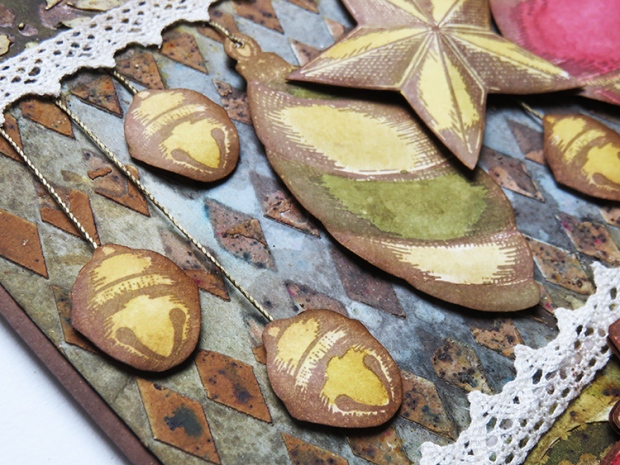
Christmas Baubles cards
Using ESC08 (Vintage Christmas Baubles stamp set) and PS072. I really like the hand drawn ornaments since they give a very unique look and since they all are in a similar style, I felt I needed to create a collection of Christmas cards. I decided that the baroque pattern was the perfect combination with them. I went for a glaze resist and I’m super happy with the results! It really makes the ornament to stand out!

That baroque pattern really is a good background. It seems that the ornaments are against a vintage wall and they have that vignette effect thanks to the ink on the edges. If I wanted to do another collection, perhaps I would try to add volume by fussy cutting the images. And I could swap the baroque stencil and use the diamonds stencil instead. You’ll see that stencil coming to play later.

Christmas Panel
I envisaged my sentiments hanging, so I decided to create a piece with all my ornaments at the same time where they would effectively be hanging, in this case, of golden thread (although I had the impulse of using a metal chain instead, but I refrained myself this time…. next time I’ll go for it!). Of course, this is a big piece, not to post it over the mail (trust me, it doesn’t fit, I tried already) but still I wanted to see what I could get. And I must admit that I’m in love with this piece!

I went and curved each ornament to try and give it volume. Can you notice it? The star can be creased on the lines and you should see it in reality (if you come to Ally Pally in September, I’ll bring it so you can see it in person). It was so easy to give volume to these! I’ll repeat for sure!
And what about the bow? Do you see something familiar behind? It’s the Merry Christmas banner! I was so happy when I tried them together! It’s a bow with character, don’t you think? And again every part is curved and sticked on top of other pieces and using foam so I keep the 3D effect.

17/12/2017 – I’m editing the post to include the video for this panel:
Vintage Frames
Since my first release, when I launched ESC03 (Voyager) I fell in love with the vintage frames that you can find in old maps, so this idea was always in my mind: creating a stamp set of empty frames and coordinating sentiments, so you can mix and match. And I’m so happy I finally did it! You would think that you can’t do much with these, but let me tell you that now we are IN HALF PART of the release, because these frames really got me and I had to try many things, so get ready, because there are many samples to come and some of them are explained in the video at the end of the post below!

Frames, Frames, Frames
I knew I wanted to create a card with all frames stamped as if it was a background and then the idea was stamping the Merry Christmas just in the middle one, but you know what, I had to stamp them all! They were craving letters!!!

These look beautiful as a background. If I tried again, perhaps I would fussy cut the one in the middle and stick it on foam so it pops more than the rest. And talking about fussy cutting … Do you create your own marmalade and preserves? These would be fantastic labels to decorate the jars of your handmade deliciousness! Or to add labels anywhere, book cover, art journal, brushes pots, plants, label everything in vintage style;)

Vintage Christmas Card
Among the 4 frames available in the set, I think this one is my favourite, so I wanted to create one card where this would be the focal point. And I also wanted to use the L shape frame to create an outsider frame on the card.

The L shape frames gave me the opportunity of adding a couple of brads in the empty spaces, which I believe give a great look to the card. And to make it stand out even more, I decided to use 2 pieces of brown card stock to create an outside frame for the card. I love the corners! And you should touch the card! The stamped images were covered with glaze and then I used so much water that when everything was dry, for some reason the images seemed embossed, they have volume!

Diamond Grungy Tags
I love grunge paste and I love infusions and this design (frame over diamonds) had been on my mind for a long time and now I had the stencils and stamp sets, it was time to play!

I enjoyed so much creating these tags… the first one is a simple “all grunge paste” and then infusions, but the other 2 are half grunge paste and half 2 other things. Can you guess? Not yet? Then let’s see another sample with same techniques but swapping colours, sentiments and using the other stencil.

Baroque Grungy Tags
Love these!! I think Santa Claus will have to give me few pots of grunge paste as a present because I’m going to use it all making these for Christmas! And I want to try how they look combining the 24 Infusions colours!

My heart is divided between the green one and the blue one… I can’t choose… Which one is your favourite? Blue or green?

For the blue one I used grunge paste partially over the stencil, then I used ink to complete the pattern and then I applied infusions on top:

And for the green one I partially applied grunge through the stencil, then I applied a first layer of Golden Sands infusions, then I placed back the stencil on top of the design and applied some glaze through it. Finally some Olive tree infusions on top and I got this nice effect:

You can watch all the details in the video below about these tags. I hope you like it. Many other videos will come, but we will leave them for another post:
Thanks so much for coming by! I hope you found good inspiration. I would love to read your comments about the release and the samples I made. If you still want to see more pictures and techniques explained, you are welcome to subscribe to my blog! More videos will come also on my youtube channel, make sure to subscribe. And if you want to buy the stamps and start creating your Christmas presents, cards and tags, check out my etsy shop.
Youtube: https://www.youtube.com/c/scrapcosy
Instagram: https://instagram.com/scrapcosy/
Facebook: https://www.facebook.com/scrapcosy
Etsy: https://www.etsy.com/uk/shop/Scrapcosy
You can find me teaching at Crafting at Ally Pally in the PaperArtsy booth. Make sure you come to one of the Make and Takes! it will be fun! You can buy advanced tickets and see more details about the show here:
I hope you liked it! Thanks for reading! And see you soon! 🙂 If you want to send any comments or subscribe, go to the end of the post below
2017 Winter Release – PaperArtsy stamps by scrapcosy
La Navidad es esa época del año en la que todas las que hacemos manualidades estamos más entretenidas, haciendo tarjetas handmade, creando regalos artesanales, incluso quizás haciendo encargos para que otras personas regalen nuestras creaciones. Es duro, nos quita mucho tiempo, pero nos encanta! Diseñar sellos y estenciles para la época navideña en estilo vintage, tampoco ha sido algo sencillo, pero estoy súper contenta con el resultado y mi mente ya esta en modo Navidad. Se acerca el invierno!
Así que dejadme que os presente a mi dream team invernal del 2017!
ESC07 – Winter Flora and Fauna
Como sabéis me encantan las imágenes vintage de botánica, así que estuve buscando algunas que fuesen emblemáticas de esta época y qué mejor que una rama de acebo, un pino / abeto y una piña? Y cuando encontré el ciervo me enamoré y lo tuve que poner en el centro, es mi estrella principal 🙂 Y para poder hacer una tarjeta rápida navideña, he incluido una frase de buenos deseos para el año que empieza en una de mis tipografías favoritas.
PS073 – Let it snow
Quería crear un estencil que tuviese mensajes bonitos, nieve y puntitos, porque quería crear tags y postales con él. Disfruté mucho usando mi estencil PS064 que lancé en julio, así que quería algo similar pero de estilo invernal. Y mi objetivo era usarlo con el set de sellos anterior, el ESC07.
ESC08 – Vintage Christmas Baubles
Ya sabéis que me encanta recuperar imágenes vintage de libros y documentos antiguos. Cuando tengo una imagen en mi mente (un tipo de flor o de planta que me gustaría incluir en la colección) y la encuentro, oigo de fondo a un coro cantando “aleluya” y me invade una alegría inmensa, la habitación se llena de luz, y esa noche me voy a la cama con una sonrisa en la cara. Pero para este set no había manera… yo tenía en la cabeza un conjunto de adornos navideños que no encontraba en ningún sitio, así que tuve que cambiar de estrategia: los dibujé yo! Con dos bolas! navideñas! Y una estrella, un cascabel, un banner de Merry Christmas y un lazo. Lo único que recuperé de libros antiguos fue las letras y la tira de abajo.
PS072 – Christmas Wreath
Aunque no os lo creáis este estencil surgió de casualidad… Diseñé la filigrana barroca que se repite 7 veces en toda la corona y estaba intentando crear con ella un fondo que pudiese repetirse, es decir que pudieses reposicionar el estencil y repetir la imagen tanto como quieras para poder crear tus fondos. Bueno, pues jugando con la imagen, no había manera, por muchas vueltas que le diera, así que empecé repitiéndola y girándola hasta que se me cerró el círculo. Y luego por mucho que quise incluir una octava figura en el centro, no quedaba bien. La quité y volví a observar lo que acababa de crear… y me encantó! Así que le puse un Merry Christmas curvado encima, y no necesitaba nada más. Y sabéis qué? Es una pasada usarlo para crear fondos! Porque lo normal es que el fondo lo uses de fondo (evidentemente) y que en el medio haya una imagen destacada. Pues así lo usé para hacer una serie de tarjetas que veréis más abajo y el hecho de que el medio del estencil este vacío en realidad me ayudó 🙂
ESC09 – Vintage Frames
En mi primera release de sellos, cuando lancé el ESC03 (Voyager) me enamoré de los marcos vintage que encontraba en los mapas antiguos, así que esta idea llevaba ya tiempo rondándome la cabeza: crear un set de sellos de marcos vacíos que se pudiesen rellenar con frases y que pudieses usar indistintamente. Y por fin lo he conseguido! Pensaréis que poco se puede hacer con unos marcos, pero no es así. De hecho este set me engatusó y se me llenó la cabeza de ideas que quería probar. He incluido 3 frases que son las que más uso a la hora de crear tarjetas: Merry Christmas, Happy Birthday y Thank You, en la misma tipografía que la que he usado en el set ESC07. Y también he añadido un marco en forma de L que ya veréis qué bonito queda en una de las muestras que he hecho. El vídeo de hoy que está más abajo es sobre este set de sellos.
PS074 – Diamonds and baroque stripe
Tenía un estencil de rombos grunge/vintage de otra marca, donde los rombos estaban desgastados y descubrí una técnica muy chula para crear un fondo de dos colores con ellos. Yo quería crear un estencil también a rombos, pero que fuese de rombos enteros, y si quieres, el efecto desgastado se lo das tú. Y como no, quería un estencil que pudiese reposicionarse y usarse para crear un fondo tan grande como quieras (parece que estoy obsesionada con crear fondos infinitos, como el de ladrillos que hice en el PS064) pero es algo importante para mí. Y además lo bueno de este estencil es que hay un segundo elemento, las filigranas barrocas, que también se pueden usar con el mismo objetivo. Es el estencil que más he usado en las muestras de esta release y creo que se acaba de convertir en uno de mis favoritos.
PS071 – Calendar
Cuando diseñé el ESC09 (Vintage Frames) tenía en mente crear mi propio calendario, así que pensé que sería una buena idea tener un estencil con meses y números. Si hacéis art journals y os gusta fecharlos, también os puede resultar útil. Y finalmente, si queréis crear los títulos de viajes (Trips), notas (Notes) o libros (Book) pues podéis usar la palabra correspondiente.
Y ahora os presento las muestras que he hecho utilizando estos nuevos sellos y estenciles. Y para acabar podéis ver el vídeo en el que os enseño como crear algunas de estas muestras.
Winter tags
Hechas con ESC07 (Winter Flora and Fauna stamp set) y PS073 (Let it snow stencil). Me encanta hacer regalos y colgarles etiquetas con el nombre de la persona que los recibe, así que creé estas tags con eso en mente:
Me encanta el hecho de poder estampar el abeto repetidamente y a distintas alturas para poder crear mi propia escena invernal y el poder añadir tantos copos de nieve como quiera
Aquí mi ciervo parece que esté a punto de salir saltando de la tag. Le curvé las esquinas para darle más volumen.
Y ese Let it snow me pedía copos de nieve a gritos!
Para esta última nada de grunge paste, usé mi estencil con tinta y me pasé un rato muy relajante coloreando mi acebo con infusions.
Christmas Baubles cards
Con ESC08 (Vintage Christmas Baubles stamp set) y PS072. Como todos los adornos están dibujados a mano y siguen el mismo estilo, me dio por crear una colección de tarjetas navideñas. Me ha encantado usar el estencil con glaze y hacer un resist. Y al añadirle tinta en las esquinas hice un efecto vignette que me fascina. Hace resaltar mis adornos un montón, verdad?
El fondo barroco me recuerda a una pared vintage en la que parece que estén colgados los adornos.
Christmas Panel
Cuando dibujé mis adornos, me los imaginé colgando, así que decidí crear un proyecto usándolos todos y colgándolos, en este caso, usando un hilo dorado.
Di forma a cada elemento para que pareciese estar en 3D. La estrella se puede doblar por las rallas y queda en relieve, es una pasada! Y el resto de elementos también se pueden curvar muy fácilmente. Seguro que repito!
Y qué os parece ese lazo? Veis algo familiar? he usado el banner de Merry Christmas de fondo para crear un lazo con más “fundamento” y carácter. Y por supuesto, también lo he curvado para que parezca de verdad.
17/12/2017 – Edito el post para añadir el vídeo de este proyecto:
Vintage Frames
Frames, Frames, Frames
Quería crear una tarjeta que fuese una repetición de marcos (como si fuese un marco) y quería estampar un único Merry Christmas en medio, pero al tener todos esos marcos, no pude resistir la tentación y tuve que rellenarlos todos!
Me encanta el fondo que se puede crear con ellos. Y además de para tarjetas o tags (como veréis abajo) se pueden usar para crear vuestras propias etiquetas de mermeladas o conservas o de cualquier cosa que queráis etiquetar con un toque vintage.
Vintage Christmas Card
De los 4 marcos creo que este es mi favorito, así que quise hacer una tarjeta en la que mi punto focal fuese él. Y también quería enmarcarlo, así que usé el marco en forma de L alrededor.
Ese marco en forma de L me dio la oportunidad de colocar dos brads en dos esquinas que le dan un toque muy bonito. Y con dos piezas de cartulina marrón, hice el marco externo que tiene esquinas cortadas.
Diamond Grungy Tags
Me encanta la pasta de textura Grunge Paste y me encantan los Infusions, y este diseño (marcos encima de rombos) llevaba en mi mente mucho tiempo así que era hora de plasmarlo jugando con mis nuevos productos!
Hice 3 técnicas diferentes: todo grunge paste e infusions (azul), parte grunge paste y parte tinta (verde) y parte grunge paste y parte glaze (roja y amarilla) y me gustaron tanto que las tuve que repetir cambiando de estencil.
Baroque Grungy Tags
Estas me encantan! Creo que para Navidad le pediré a Papá Noel o a los Reyes Magos un par de botes de Grunge Paste porque a este paso me acabaré el bote que tengo! Estoy deseando probar esto mismo con más combinaciones de colores de los 24 que hay entre los Infusions!
No puedo decidir cuál me gusta más… Estoy entre la azul y la verde… cuál es vuestra favorita?
Para la azul estos son los pasos que hice: aplicar parcialmente grunge paste, luego tinta y luego infusions encima:
Y para la verde use Grunge Paste de nuevo parcialmente, luego infusions Golden Sands, después glaze y luego Infusions Olive Tree.
Podéis ver todos los detalles sobre estas 3 tarjetas y otras 3 más en el vídeo a continuación. Otros vídeos de las otras tarjetas irán apareciendo, pero los dejaremos para otra ocasión:
Muchas gracias por leer! Espero haberos inspirado. Me encantaría leer vuestros comentarios sobre el lanzamiento y sobre las muestras que he hecho! Si queréis ver más fotos y más técnicas, os invito a suscribiros a mi blog y a mi canal de YouTube. Y si queréis comprar mis sellos y empezar a crear regalos y tarjetas navideñas os podéis pasar por mi tienda etsy. Ya están disponibles!
Youtube: https://www.youtube.com/c/scrapcosy
Instagram: https://instagram.com/scrapcosy/
Facebook: https://www.facebook.com/scrapcosy
Etsy: https://www.etsy.com/uk/shop/Scrapcosy
En una semana me podréis encontrar en la feria de scrap Crafting at Ally Pally en el stand de PaperArtsy dando talleres y haciendo demos. Si os venís a Londres, ya sabéis, venid a saludarme y apuntaros a los Make and Takes, será divertido! Podéis comprar vuestras entradas en la web (también venden en puerta) y ver más detalles de esta feria en este link:
Hasta la próxima!

Sólo puedo decir una cosa…. me encantan 😍 . La idea de las etiquetas ideal y las infusión se han convertido en indispensables gracias a ti 💞💞. Enhorabuena por estos nuevos sellos y plantillas 😉😉
LikeLiked by 1 person
Muchas gracias!!
LikeLike
Merry Xmas!!!!… and good job!!… once again.
LikeLiked by 1 person
Thanks!! 🙂
LikeLike
Me has dado una buena idea.Tengo unos tarros de cristal en la cocina muy sosos y se me ha ocurrido que con tus etiquetas pueden quedar monisimos.Te felicito por tu trabajo, me encanta tus nuevos sellos y estenciles.
LikeLiked by 1 person
Gracias!! 🙂
LikeLike