
Happy New year to everyone! I hope you had a very happy festive period and that you start the 2016 achieving your New Year resolutions. In my case, they are more sport, a healthier diet and more scrap! Let’s see if I can make it… For now, I start the year with this card which is pretty simple to make. Just see the video. I hope you like it.
Feliz Año a todos! Espero que hayáis pasado unas felices fiestas y que empecéis el 2016 consiguiendo todo lo que os hayáis propuesto. En mi caso los buenos propósitos para el 2016 son más deporte, comida más sana y más scrap! A ver si lo consigo… De momento, empiezo el año con esta tarjeta bastante sencilla de hacer. Ya lo veréis en el vídeo. Espero que os guste!

En castellano por aquí / Spanish here
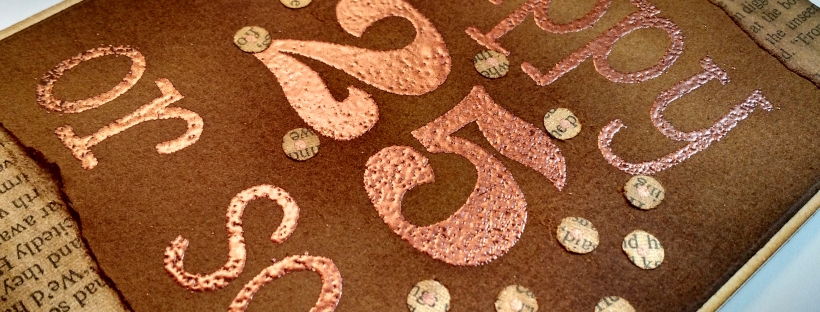
I made today´s card for a friend who doesn’t like to tell his age, hence the sentiment on it (Happy 25 or so…). It’s a simple and quick card to do. Its main techniques are ink distressing and heat embossing. I haven’t picked this techniques randomly, they are dedicated to my friend Georgina (here’s to you sweetie!) who is getting into the scrap world and who received from us on her birthday a lot of scrap tools and materials, some of them still waiting to be used (although I was in London on her birthday I contributed to elaborate the shopping list, hehe). Since we didn’t have time to meet in Xmas for a how-to session, here’s a video for her (and for all of you too) to know how to use them, so she can start creating nice things.
In the video you can also see how I use a homemade tool made by my friend Aida who gave it to me for Xmas (Thanks sweetie!!). It’s an anti-static pad (pad full of talcum powder with which you can clean the surface you’ll be embossing, since it removes static electricity and oil from fingerprints and that cleaning prevents that the embossing powder sticks to where it shouldn’t). Up until now I was using a little tin box with talcum powder and a cotton piece, but the pad is more cute and useful and it works great!
This is the video. Have fun!
And here is the list of supplies that I used to create the card:
SUPPLIES
- Distress inks: walnut stain, vintage photo, brushed corduroy
- Tsukineko Sponge Dauber
- Copper embossing powder by Aladine
- Heat gun – Embossing tool
- Versamark embossing ink
- My new awesome anti-static pad, it even has my logo! 🙂
- Papermania Fun Alphabet stamps
- Number stamps
- Ivory cardstock for the card base
- Dark brown cardstock for the focal point
- Vintage old book pages (I found it broken on a bin, hence it became a scrap supply!)
- Scissors
- Hole punch
- Glue dispenser (in tape)
- Tacky glue
I hope you liked it! Thanks for reading! And see you on the next post! 🙂 If you want to send any comments or subscribe, go to the end of the post below
#3 – VINTAGE 25 BIRTHDAY CARD – ENERO 2016
La tarjeta de hoy la hice para un amigo a quien no le gusta decir su edad, de ahí lo que he escrito (Happy 25 or so…). Es una tarjeta sencilla y rápida de hacer. Las técnicas principales que he utilizado son el distress (envejecido) con tinta y el embossing (repujado o relieve) en caliente. No he elegido estas técnicas al azar, van dedicadas a mi amiga Georgina (va per tu, wapa!), que se está iniciando en el mundo del scrap y a quien le regalamos en su cumpleaños un montón de cositas scraperas que aún están por estrenar (aunque yo estaba en Londres, ayudé en la distancia haciendo la lista de la compra, jeje). Como no tuvimos tiempo de quedar en Navidades para explicarle como usarlas, aquí le planto un vídeo (a vosotros y a ella) para que vea cómo se hace y pueda por fin ponerse manos a la obra.
En el vídeo también utilizo una herramienta homemade que me regaló mi amiga Aida por Navidad (gracias wapi!!). Se trata de un anti-static pad (un saquito lleno de polvos de talco con el que limpiar la superficie en la que vamos a aplicar el embossing y así prevenir que por la electricidad estática y por las huellas de los dedos, los polvos de embossing se peguen donde no toca). Hasta ahora yo utilizaba una cajita metálica con polvos de talco y un algodón, pero es mucho más mono y práctico el saquito que me ha hecho y va genial!
Este es el vídeo, espero que os sirva de inspiración:
Esta es la lista de materiales que usé para hacer la postal:
MATERIALES
- Tintas Distress: walnut stain, vintage photo, brushed corduroy
- Aplicador de esponja Jumbo Tsukineko
- Polvos embossing en cobre de Aladine
- Pistola de calor / secador para embossing
- Tinta Versamark para embossing
- Mi fantástico anti-static pad, que hasta tiene mi logo bordado! 🙂 🙂
- Papermania Fun Alphabet stamps
- Number stamps
- Cartulina color crema para la base de la tarjeta
- Cartulina marrón (punto focal)
- Hojas de libro antiguo (lo encontré en la papelera roto, así que para scrap!)
- Tijeras Xcut
- Perforadora de agujero
- Glue dispenser (in tape)
- Tacky glue
Gracias por leer! Espero que os haya gustado y si es así, dejadme un comentario 🙂 Hasta el próximo post!

Love it!! Very creative and original. Keep going!!
; )
LikeLike
Te ha quedado requetechula!!!!! Y ese color cobre….I love it!!!! Me alegro que te guste el embossing buddy 😉
LikeLike
Muy bien como siempre, lo haces que parezca muy facil, me encanta.
LikeLiked by 1 person
Que chulada¡¡¡¡¡ ha quedado monísima, a tu amigo le va ha encantar. Me entran ganas de hacer scrap.
LikeLiked by 1 person
Pues ya sabes, todo es ponerse y en casa tienes mi maletita escocesa de scrap… 😉
LikeLike